RabbitMQ-消息中间件实战
1. 介绍与安装
什么是MQ
首先要知道同步通信存在的问题:耦合度高、性能下降、资源浪费、级联失败 。
而异步调用常见实现是事件驱动模式,即服务向Broker发送事件,其他服务订阅事件的方式。其优点是:服务解耦、吞吐量提高、故障隔离、流量削峰。
其缺点是:1.需要Broker有良好的可靠性、安全性和吞吐能力。2.业务没有流程线,不好追踪管理。
MQ(Message Queue)消息队列,通过典型的 生产者 和 消费者 模型,生产者向消息队列中生产信息,消费者不断地从队列中获取信息,它们是异步的。
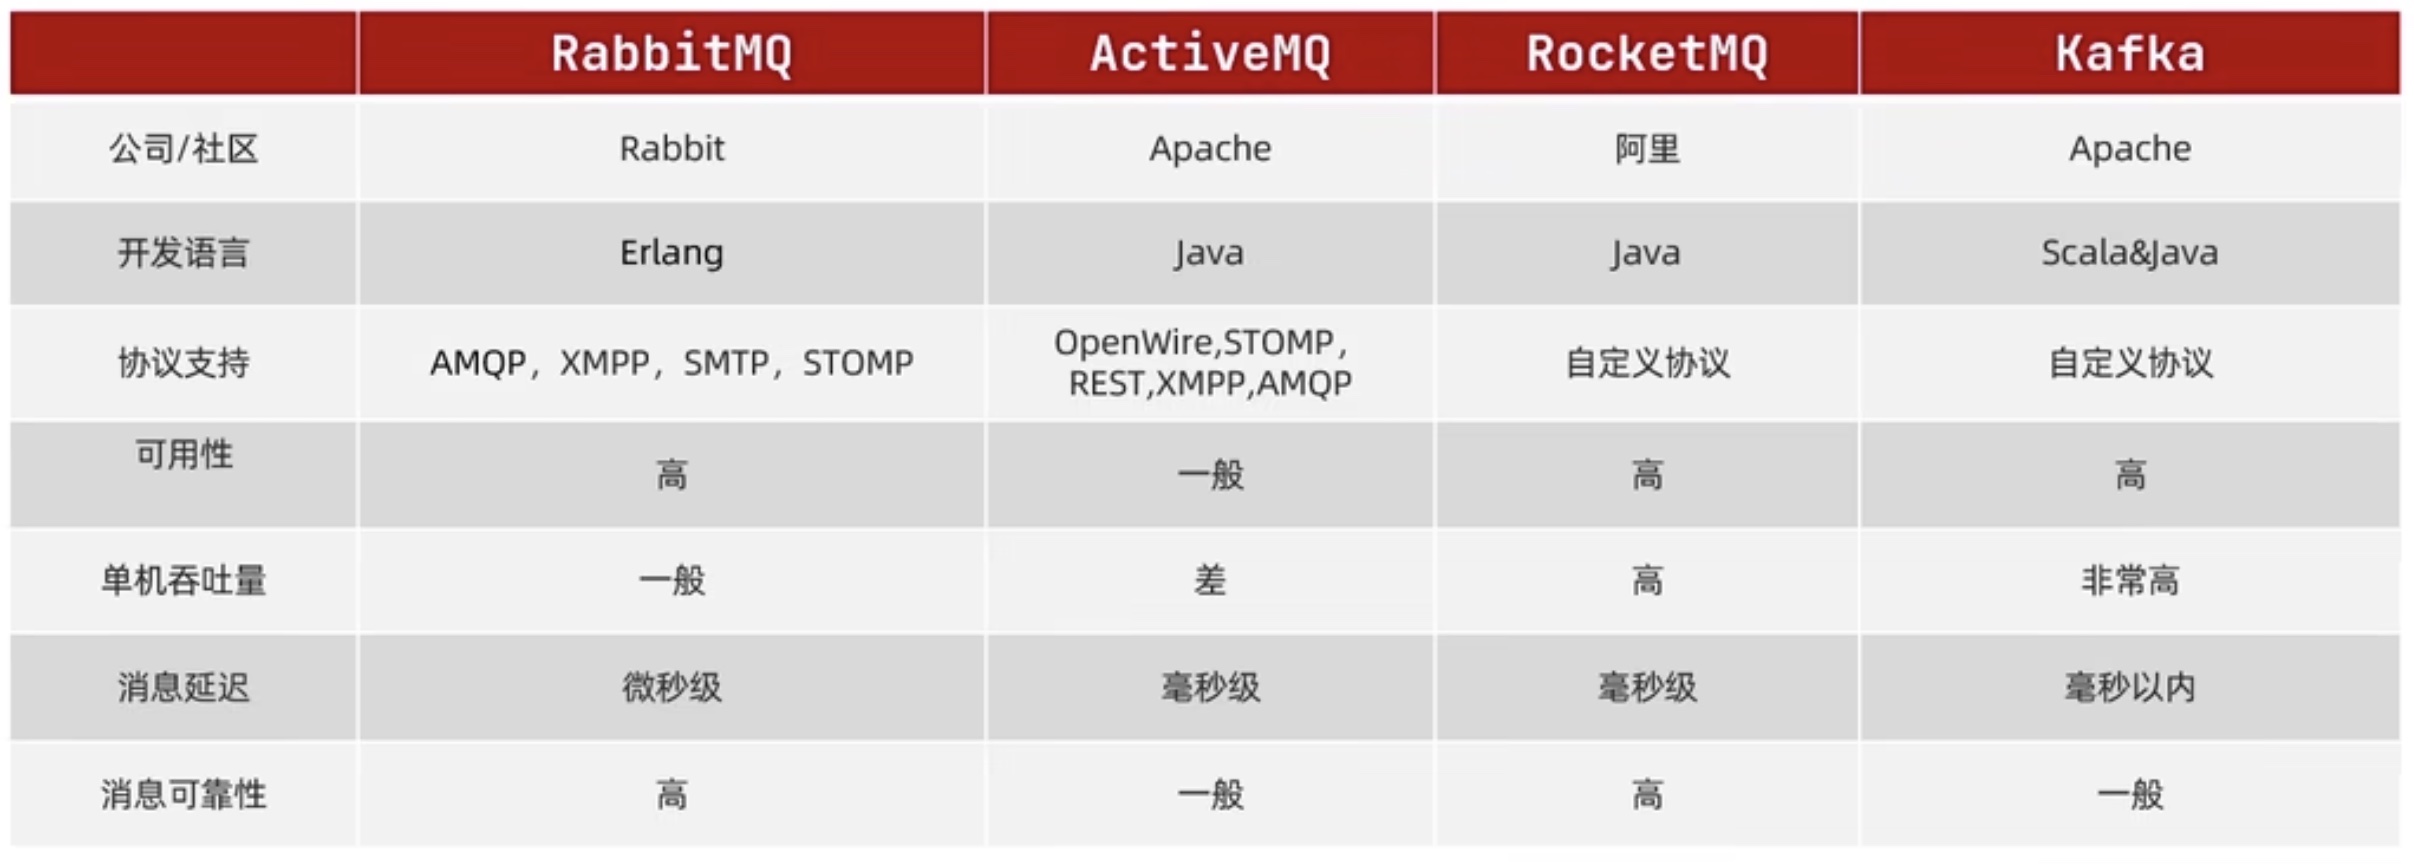
主流的MQ有哪些
有RabbitMQ、ActiveMQ、kafka、阿里巴巴开发的RocketMQ等。
其中,RabbitMQ是基于AMQP协议,erlang语言开发,部署最广泛的开源消息中间件。
安装
官方文档:https://www.rabbitmq.com/download.html
我建议直接使用docker安装
1 | docker run -it --rm --name rabbitmq -p 5672:5672 -p 15672:15672 rabbitmq:3-management |
然后访问 15672 端口,出现登录界面,默认账户密码都是guest
2. RabbitMQ配置
2.1 RabbitMQ管理命令行
1 | # 1.服务启动相关 |
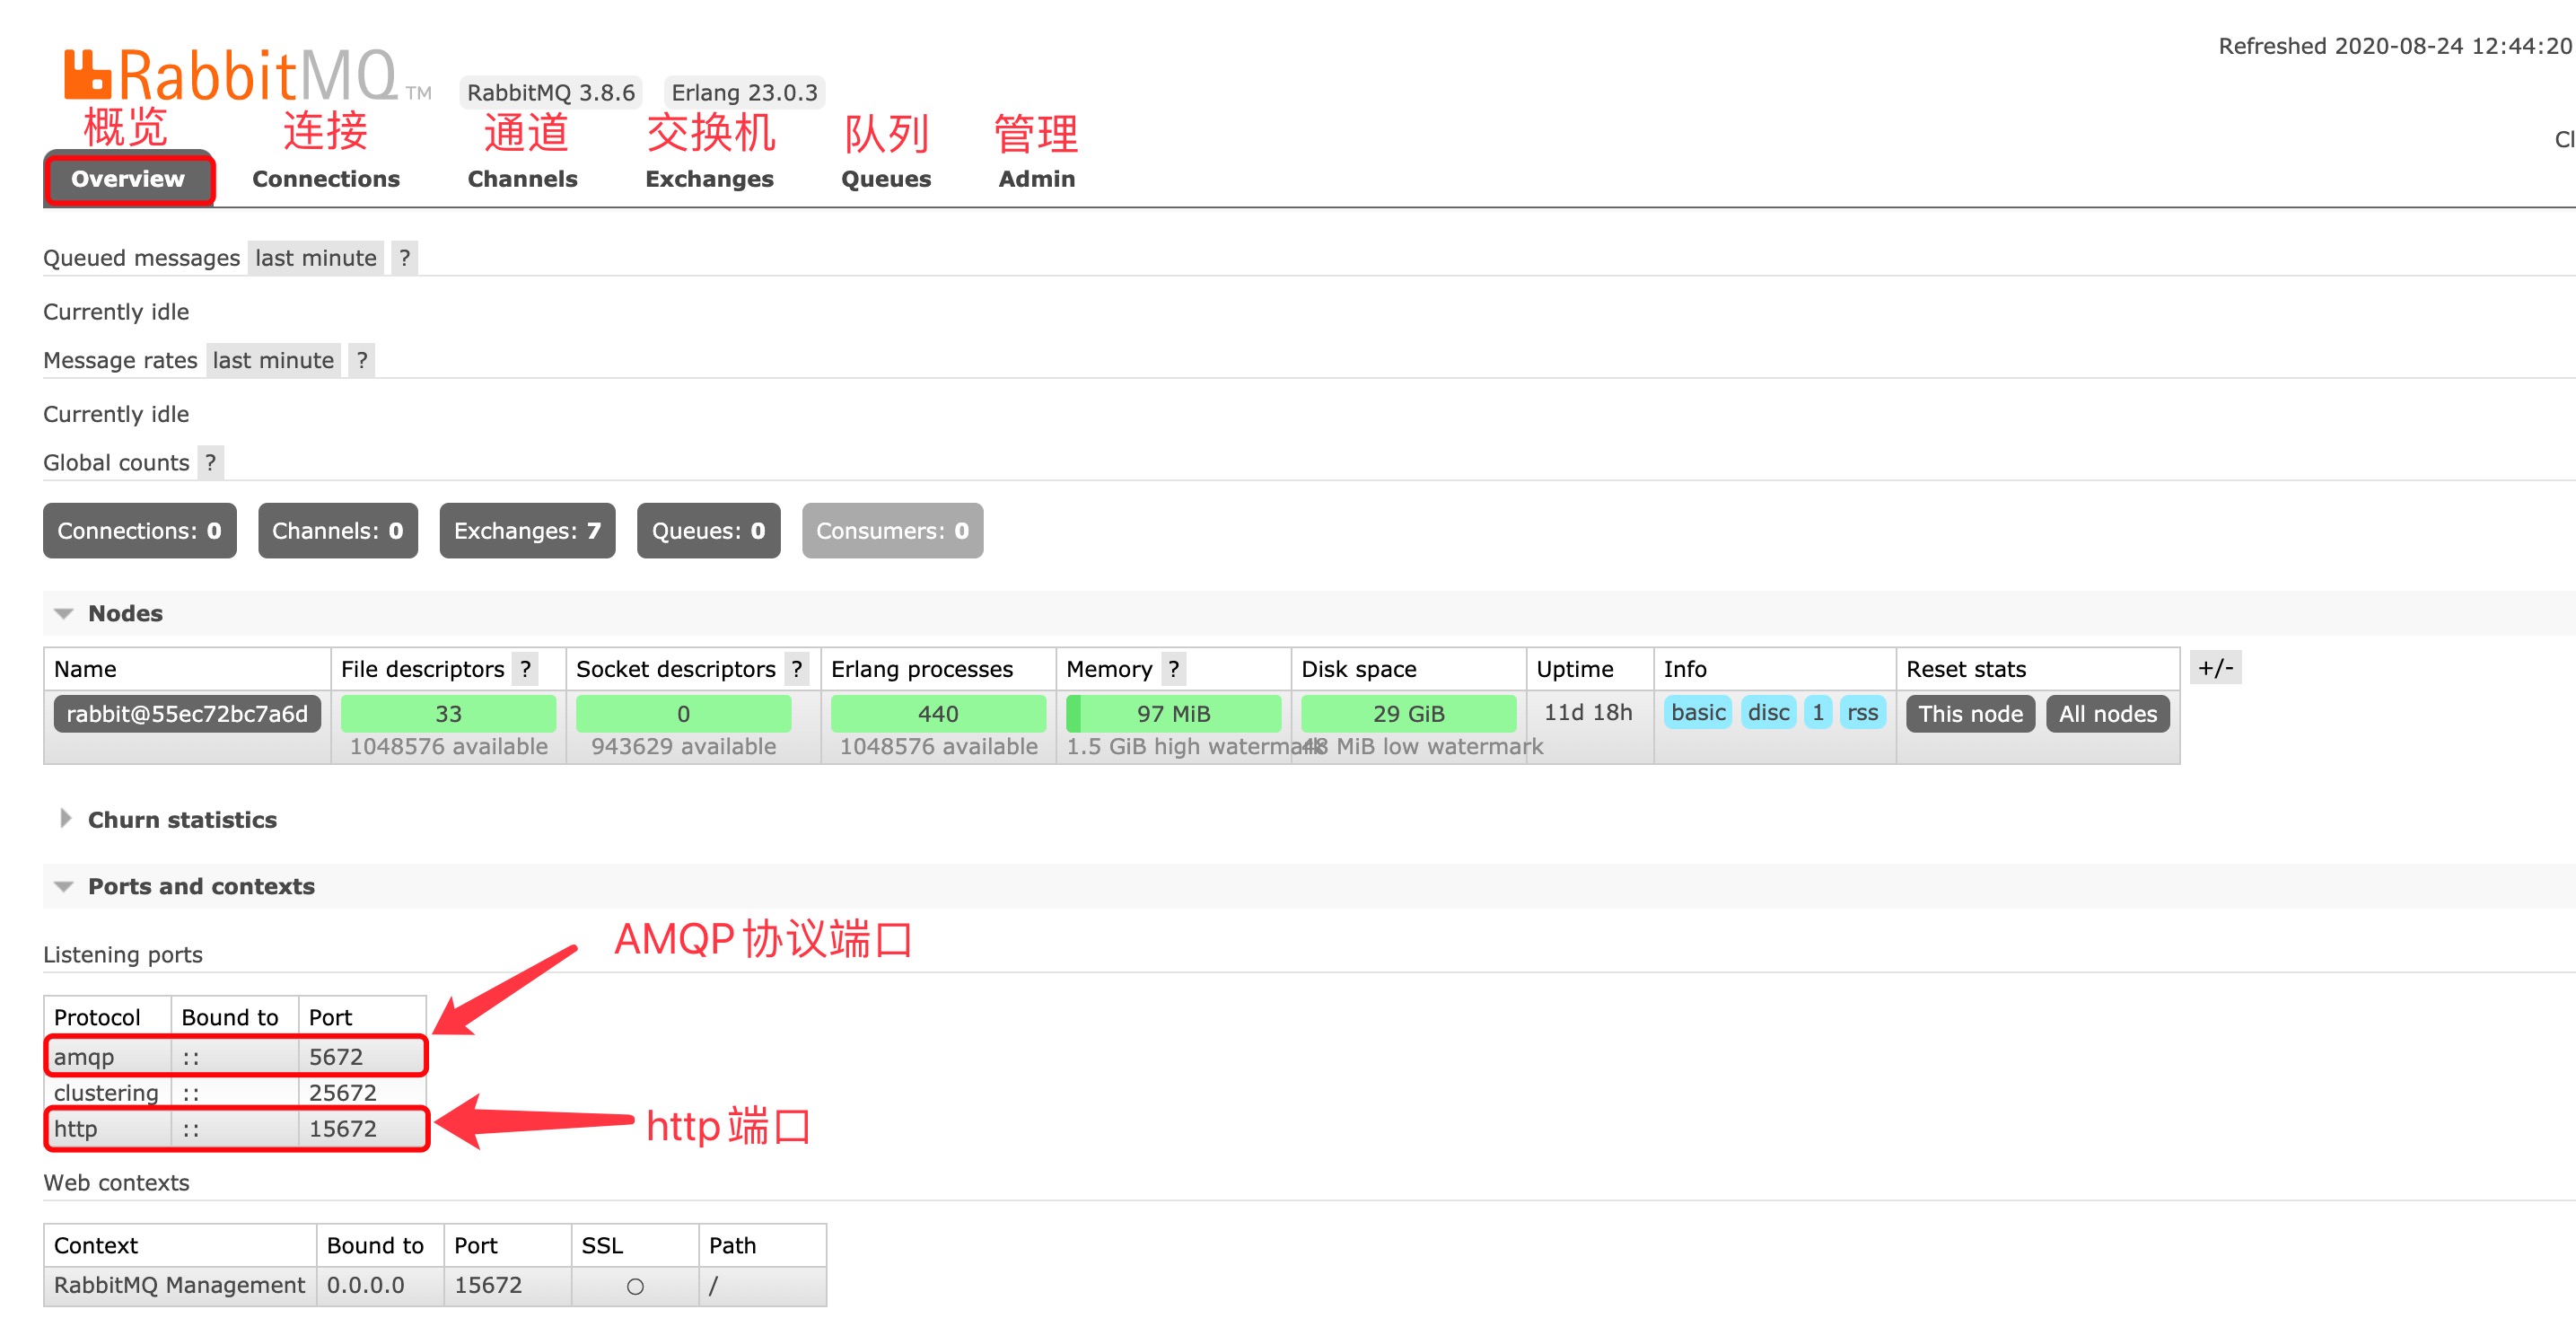
2.2 可视化管理界面
通过http访问服务器的15672端口即可进入以下界面
3. 消息模型
3.1 概览与准备
七种消息模型:https://www.rabbitmq.com/getstarted.html
1. 引入依赖
1 | <!--rabbitmq依赖--> |
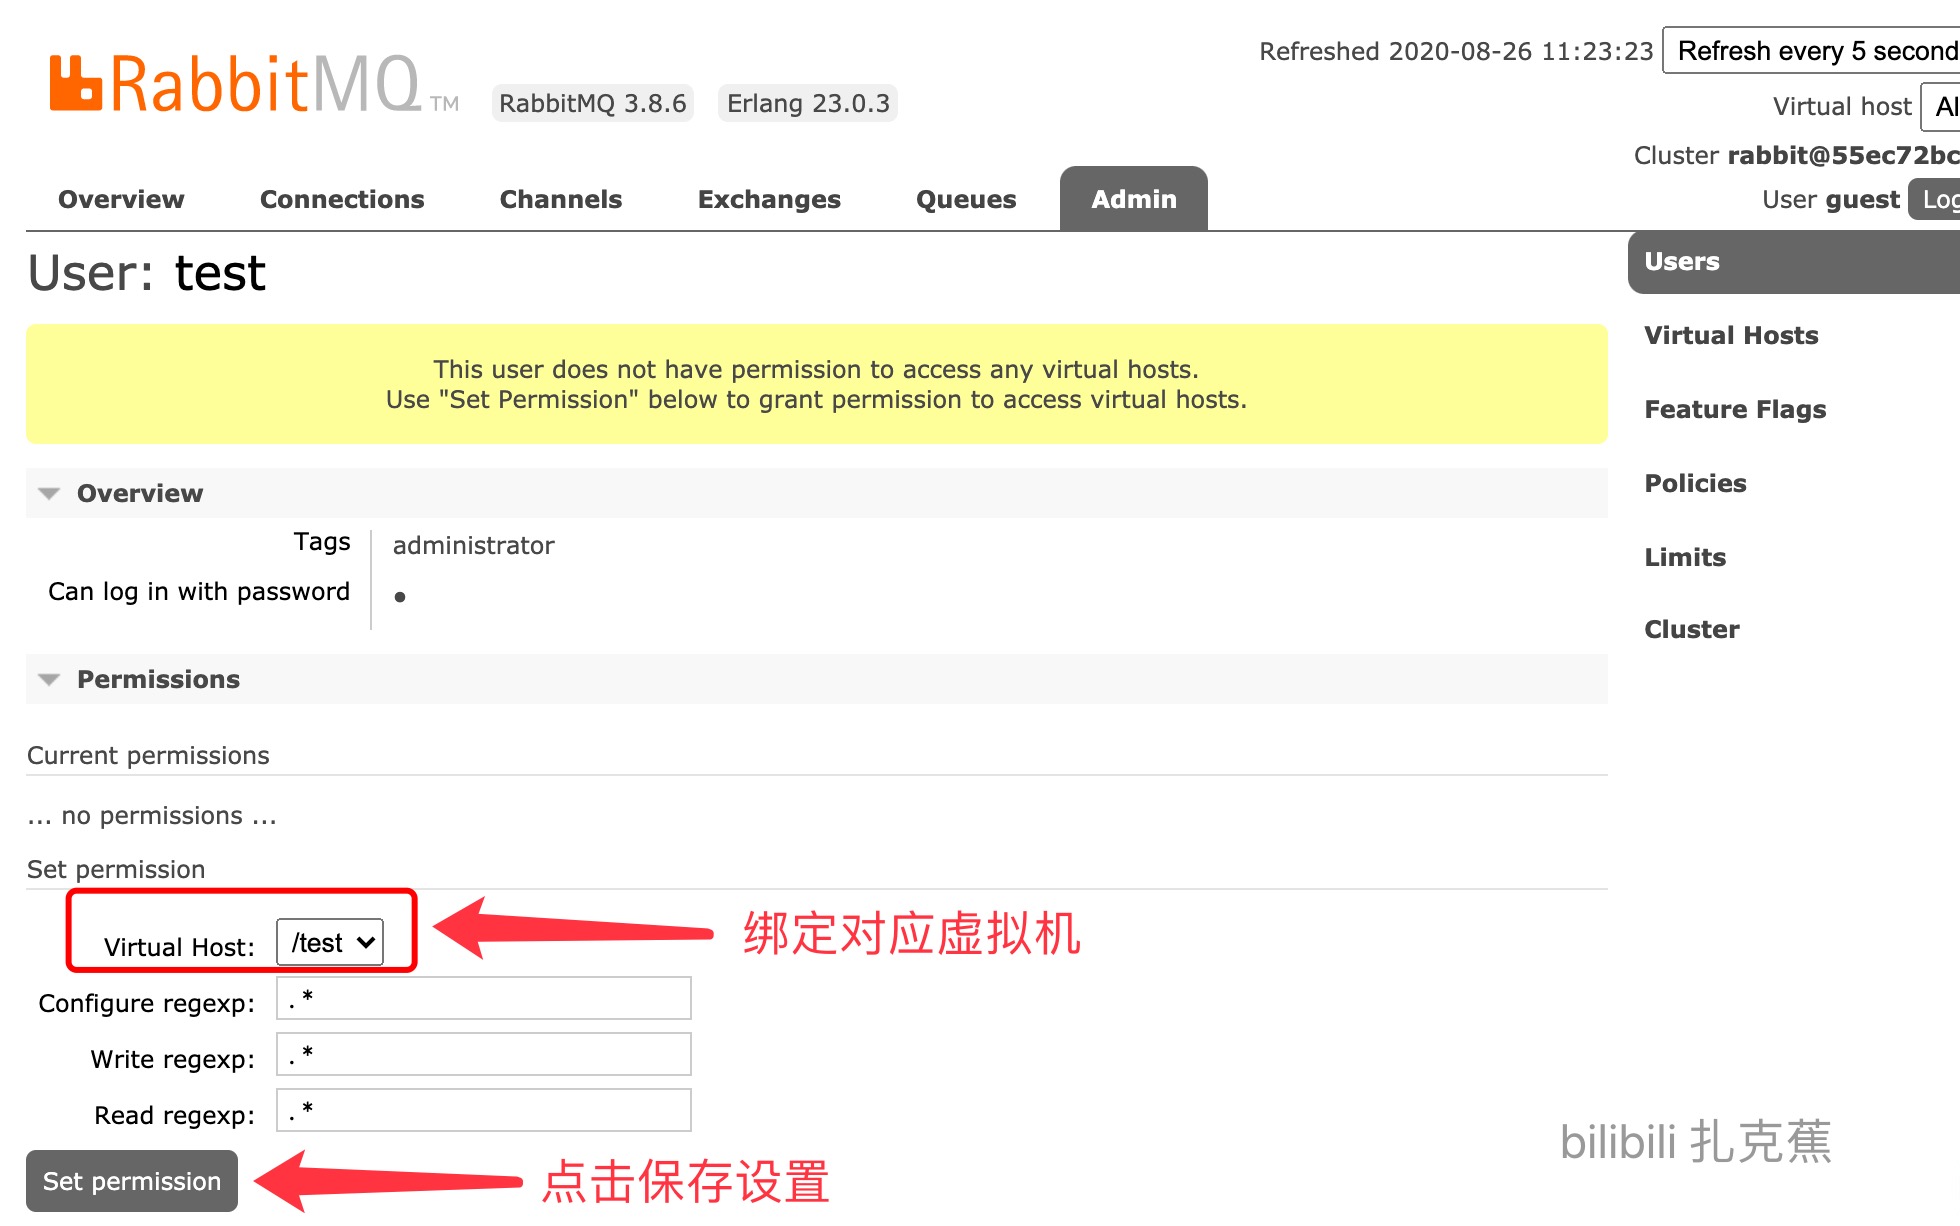
2. 在管理界面创建虚拟主机
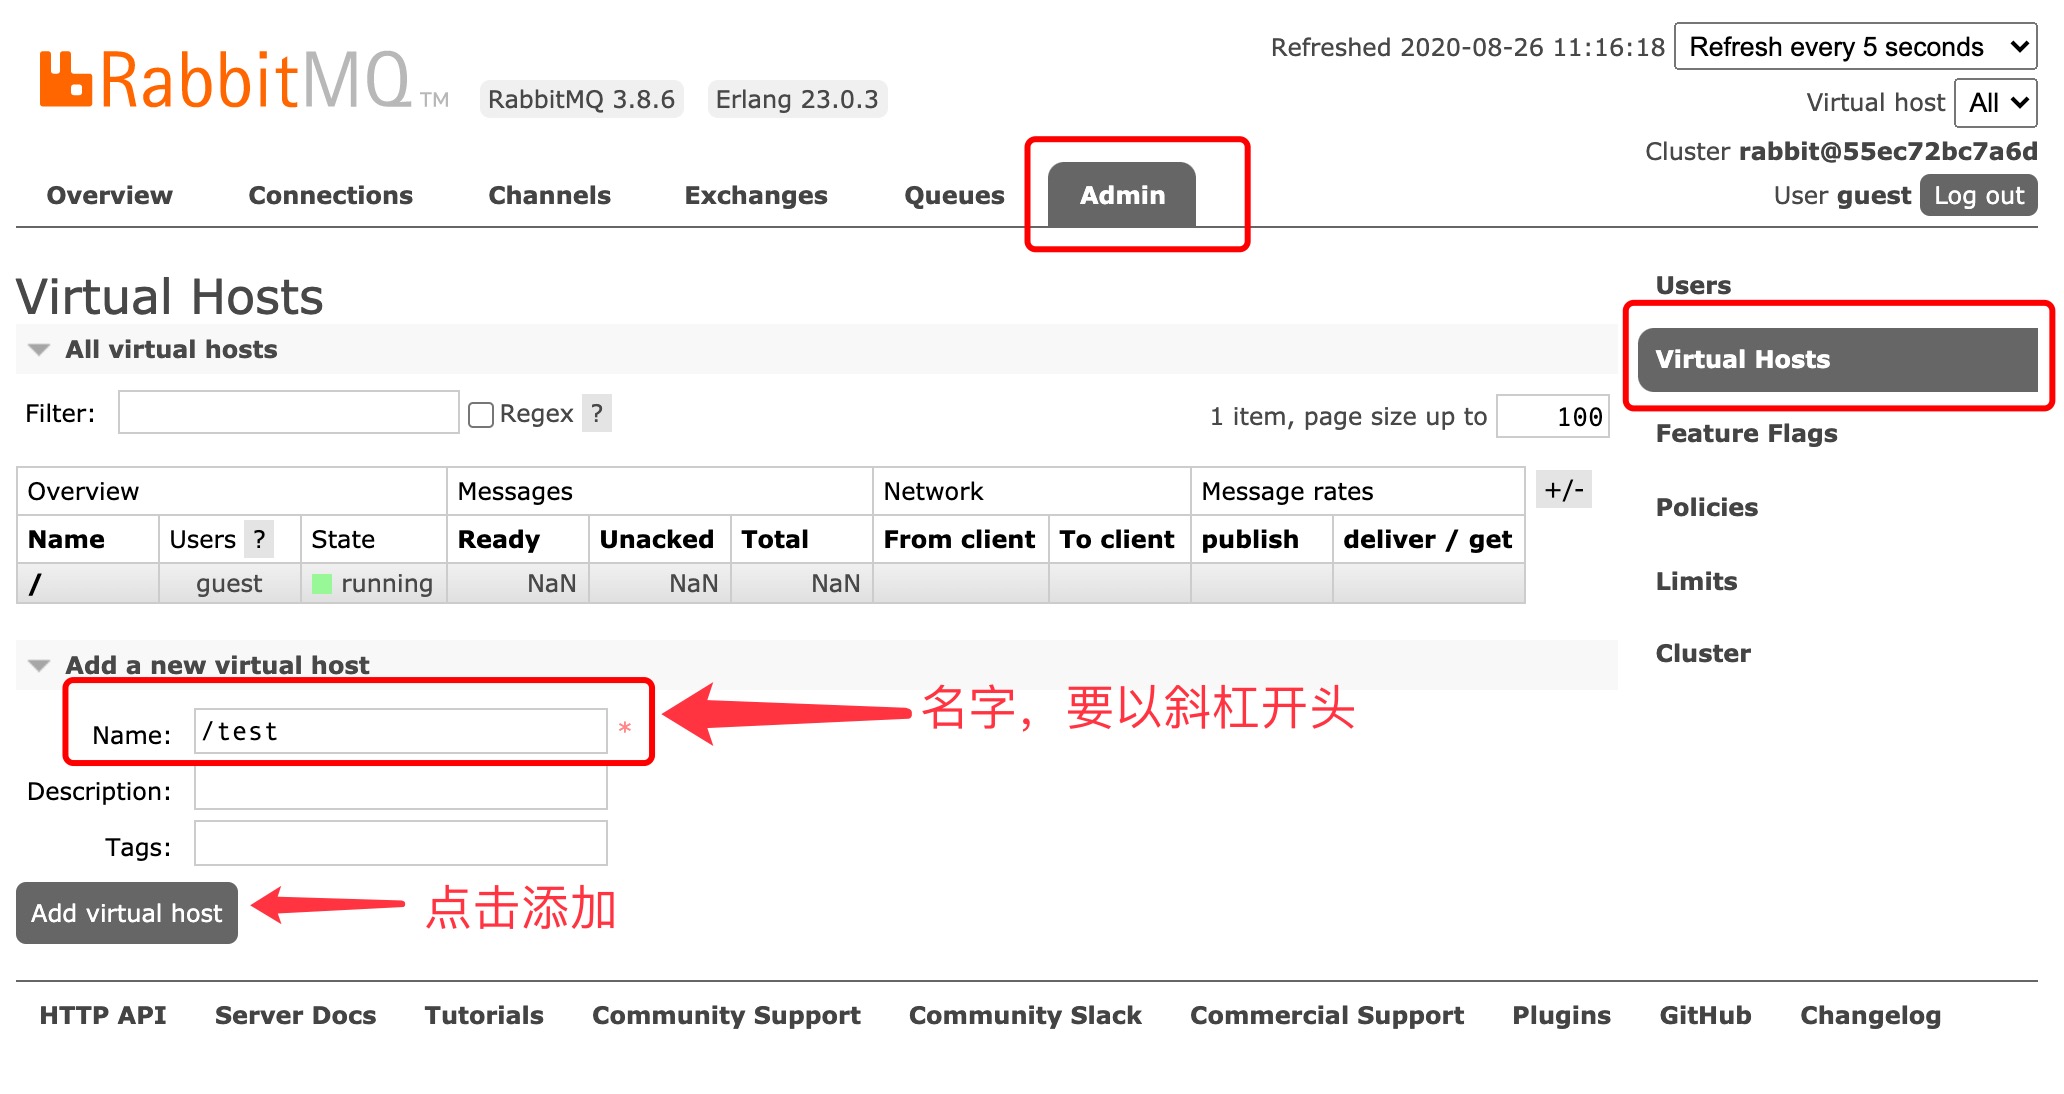
3. 创建用户并绑定虚拟主机
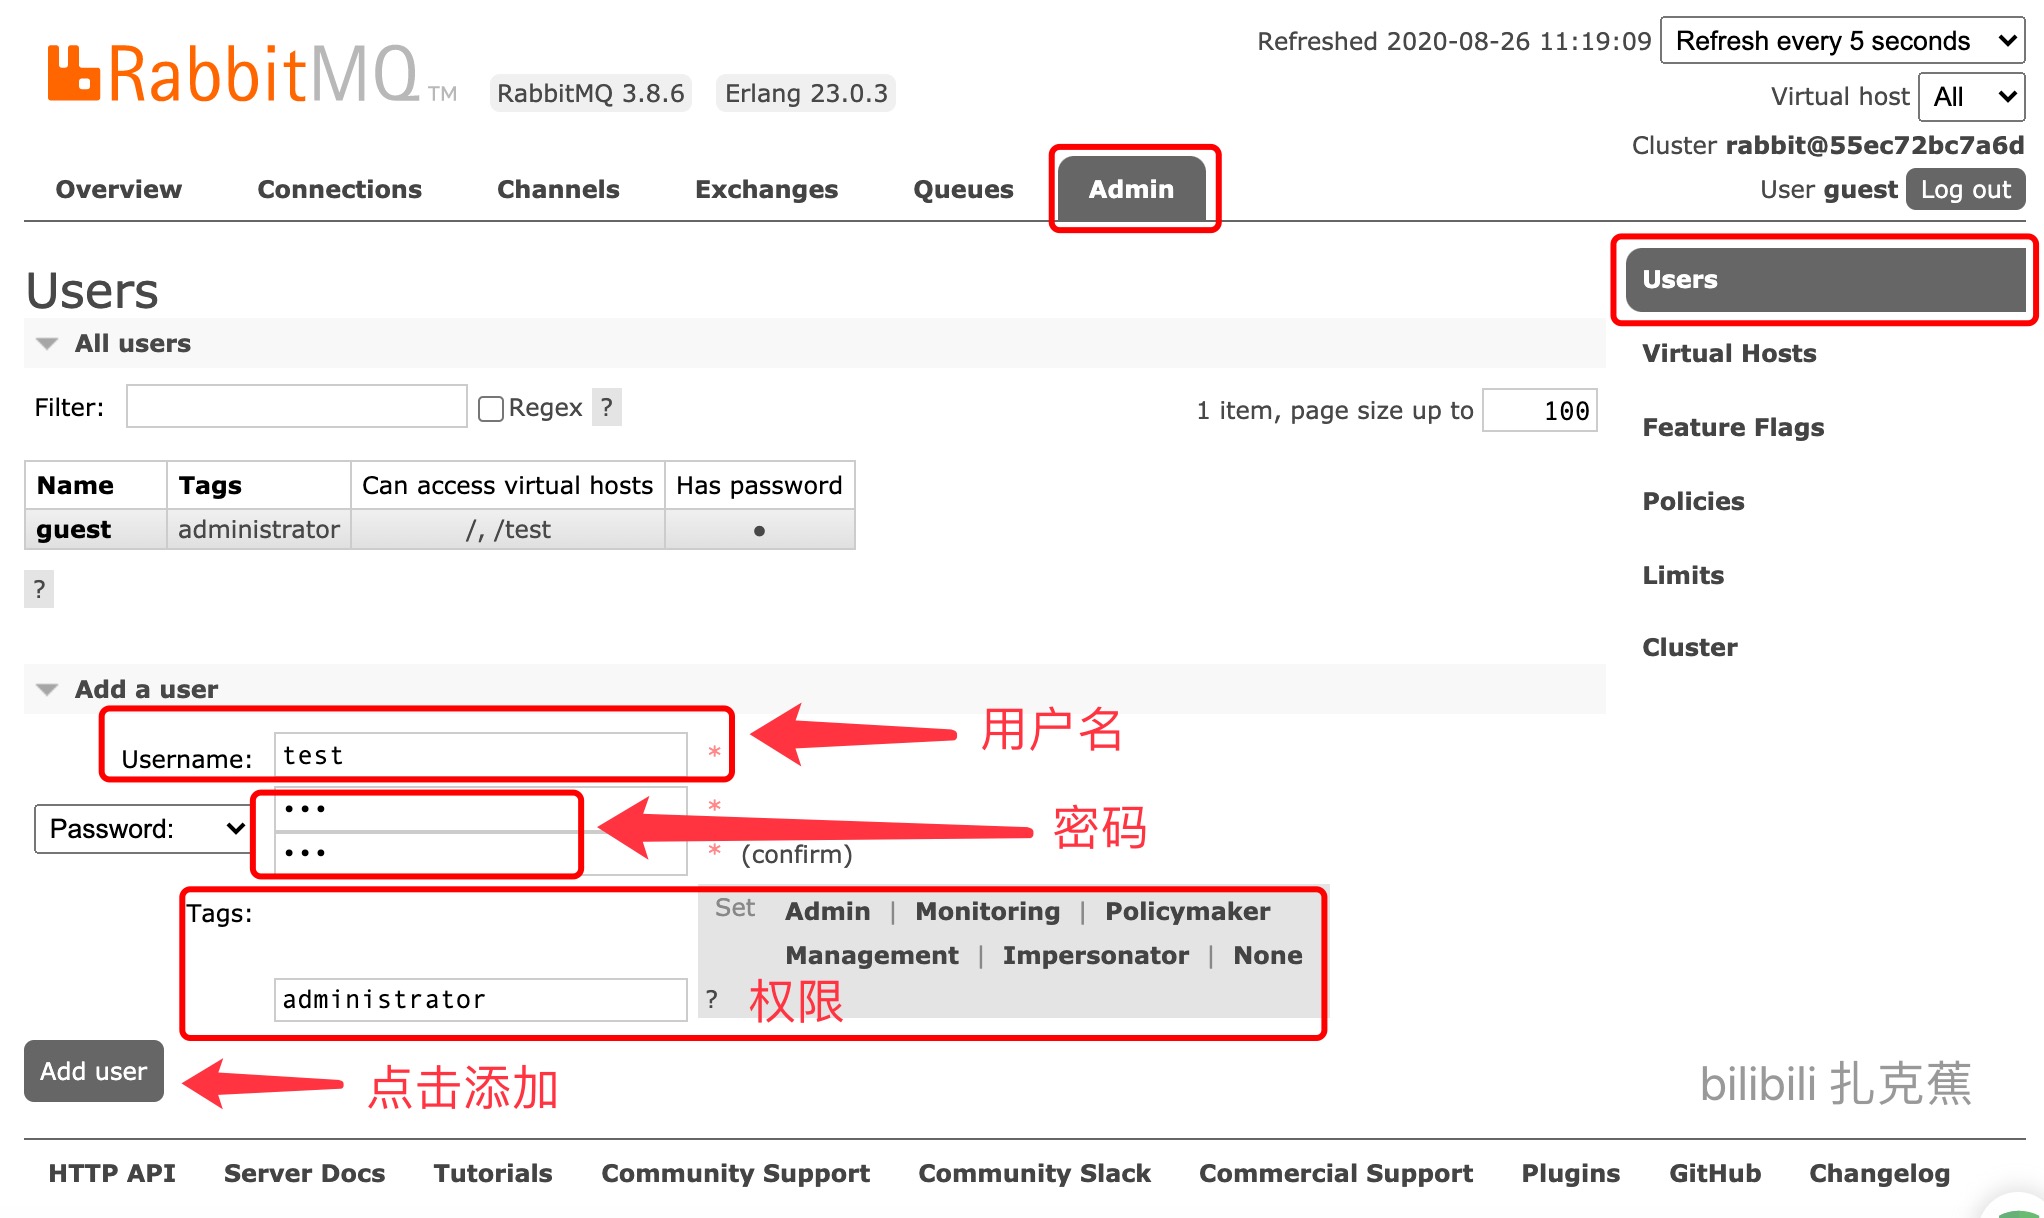
4. 点击用户名,设置Permissions中的Virtual Host即可
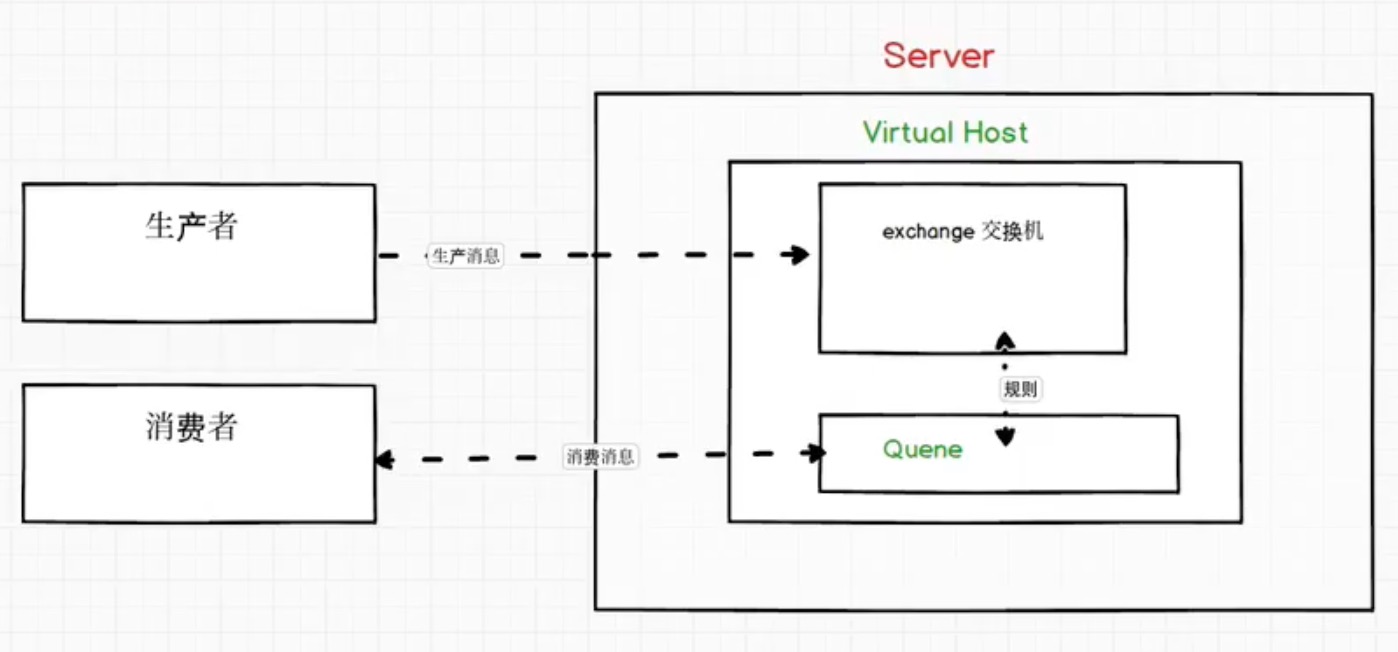
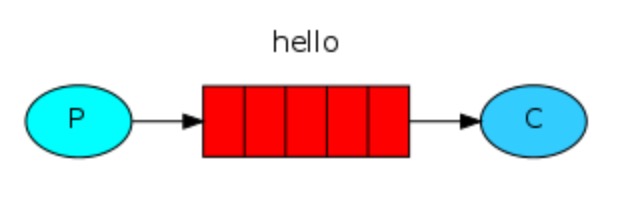
3.2 第一种模型(直连)
-
P:生产者,也就是要发送消息的程序
-
C:消费者,消息的接受者,会一直等待消息到来
-
queue:消息队列,图中红色部分,可以缓存消息,生产者向其投递消息,消费者从其取出消息
-
生产者代码
1
2
3
4
5
6
7
8
9
10
11
12
13
14
15
16
17
18
19
20
21
22
23
24
25
26
27
28
29
30
31
32
33
34
35
36
37
38
39
40
41
42
43
44
45
46
47
48public class Provider {
//生产消息
public void testSendMessage() throws IOException, TimeoutException {
//1. 创建连接mq的连接工厂
ConnectionFactory connectionFactory = new ConnectionFactory();
//2. 设置连接rabbitmq主机
connectionFactory.setHost("39.97.107.13");
//3. 设置端口号
connectionFactory.setPort(5672);
//4. 设置连接哪个虚拟主机
connectionFactory.setVirtualHost("/test");
//5. 设置用户名和密码
connectionFactory.setUsername("test");
connectionFactory.setPassword("123");
//6. 获取连接对象
Connection connection = connectionFactory.newConnection();
//7. 获取连接中通道
Channel channel = connection.createChannel();
//8. 通道绑定对应消息队列
//参数1:队列名,不存在时会自动创建
//参数2:定义队列是否要持久化
//参数3:exclusive 是否独占队列
//参数4:autoDelete 消费完成后是否自动删除队列
//参数5:附加参数
channel.queueDeclare("hello",true,false,false,null);
//9. 发布消息
//参数1:交换机名称,没有则不填
//参数2:队列名称
//参数3:额外参数,可以设置消息持久化
//参数4:消息内容,注意转换为字节
channel.basicPublish("","hello", MessageProperties.PERSISTENT_TEXT_PLAIN,"你好,rabbitmq!".getBytes());
//10. 关闭资源
channel.close();
connection.close();
}
} -
消费者代码
1
2
3
4
5
6
7
8
9
10
11
12
13
14
15
16
17
18
19
20
21
22
23
24
25
26
27
28
29
30
31
32
33
34
35
36
37public class Consumer {
public static void main(String[] args) throws IOException, TimeoutException {
// 创建连接工厂
ConnectionFactory connectionFactory = new ConnectionFactory();
connectionFactory.setHost("39.97.107.13");
connectionFactory.setPort(5672);
connectionFactory.setVirtualHost("/test");
connectionFactory.setUsername("test");
connectionFactory.setPassword("123");
// 创建连接对象
Connection connection = connectionFactory.newConnection();
// 创建通道
Channel channel = connection.createChannel();
// 通道绑定对象,注意参数和生产者中一致
channel.queueDeclare("hello",true,false,false,null);
// 消费消息
// 参数1:队列名
// 参数2:是否开启消息自动确认
// 参数3:消费时的回调接口
channel.basicConsume("hello",true,new DefaultConsumer(channel){
// 最后一个参数为消息队列取出的消息
public void handleDelivery(String consumerTag, Envelope envelope, AMQP.BasicProperties properties, byte[]body){
System.out.println("收到新消息:" + new String(body));
}
});
// 不建议close通道和连接,因为需要监听消息
//channel.close();
//connection.close();
}
}
3.3 工具类封装
可以看到,上面的生产者与消费者有大量重复的代码,可以写一个工具类来减少冗余
1 | public class RabbitMQUtils { |
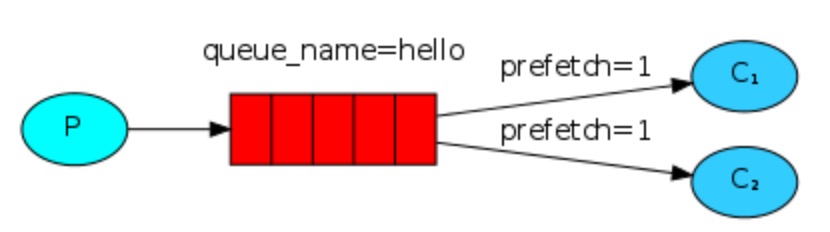
3.4 第二种模型(work queue)——平均分配
-
P:生产者,任务的发布者
-
C1:消费者1,领取任务并完成任务,假设完成速度较慢
-
C2:消费者2,领取任务并完成任务,假设完成速度较快
-
开发生产者
1
2
3
4
5
6
7
8
9
10
11
12
13
14
15
16
17
18
19
20
public class Provider {
public static void main(String[] args) throws IOException {
// 获取连接与通道
Connection connection = RabbitMQUtils.getConnection();
Channel channel = connection.createChannel();
// 通过通道声明队列
channel.queueDeclare("work",true,false,false,null);
// 生产多条消息
for(int i=0; i<20; i++){
channel.basicPublish("","work", null,(i + "你好,work queue!").getBytes());
}
// 关闭资源
RabbitMQUtils.closeConnectionAndChannel(channel, connection);
}
} -
开发消费者1
1
2
3
4
5
6
7
8
9
10
11
12
13
14
public class Consumer1 {
public static void main(String[] args) throws IOException {
Connection connection = RabbitMQUtils.getConnection();
Channel channel = connection.createChannel();
channel.queueDeclare("work",true,false,false,null);
channel.basicConsume("work",true,new DefaultConsumer(channel){
public void handleDelivery(String consumerTag, Envelope envelope, AMQP.BasicProperties properties, byte[]body){
System.out.println("1号收到新消息:" + new String(body));
}
});
}
} -
开发消费者2
1
2
3
4
5
6
7
8
9
10
11
12
13
14
public class Consumer2 {
public static void main(String[] args) throws IOException {
Connection connection = RabbitMQUtils.getConnection();
Channel channel = connection.createChannel();
channel.queueDeclare("work",true,false,false,null);
channel.basicConsume("work",true,new DefaultConsumer(channel){
public void handleDelivery(String consumerTag, Envelope envelope, AMQP.BasicProperties properties, byte[]body){
System.out.println("2号收到新消息:" + new String(body));
}
});
}
} -
运行结果

总结:默认情况下RabbitMQ按顺序将每个消息发送给下一个使用者,每个消费者平均会收到相同数量消息(平均分配),这种分发消息的机制称为循环。
3.5 第二种模型(work queue)——消息确认机制与多劳多得
消息确认机制
如果开启了消息自动确认机制,消息队列将消息一次性传递给消费者后则将消息从队列中删除,而不会去管消息是否被消费完。(channel.basicConsume中的第二个参数 true/false)因此建议关闭。
多劳多得
只需要限定消费者每次从队列中取到的消息数量即可,消费完再拿
1 | channel.basicQos(1); //每次只消费1个消息 |
然后在handleDelivery方法中进行手动确认消息
1 | // 手动确认 参数1:确认信息标识 参数2:multiple 是否开启多个消息同时确认 |
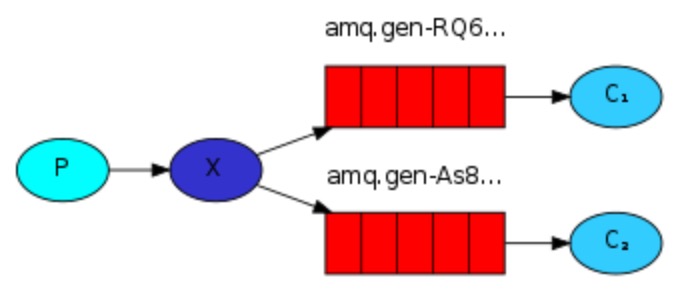
3.6 第三种模型(fanout 广播)
-
可以有多个消费者
-
每个消费者有自己的 queue(队列)
-
每个队列要绑定 exchange(交换机)
-
生产者发送消息到交换机,由交换机将消息发送给绑定过的所有队列
-
开发生产者
1
2
3
4
5
6
7
8
9
10
11
12
13
14
15
16
17public class Provider {
public static void main(String[] args) throws IOException {
// 获取连接对象
Connection connection = RabbitMQUtils.getConnection();
Channel channel = connection.createChannel();
// 将通道声明指定交换机 参数1:交换机名称 参数2:交换机类型 fanout为广播
channel.exchangeDeclare("login","fanout");
// 发送消息 第二个参数原来为队列名,但在这种模型下消息不发送给队列
channel.basicPublish("login","",null,"fanout type message".getBytes());
//释放资源
RabbitMQUtils.closeConnectionAndChannel(channel, connection);
}
} -
开发多个消费者
1
2
3
4
5
6
7
8
9
10
11
12
13
14
15
16
17
18
19
20
21
22
23
24public class Consumer1 {
public static void main(String[] args) throws IOException {
// 获取连接对象
Connection connection = RabbitMQUtils.getConnection();
Channel channel = connection.createChannel();
// 绑定交换机
channel.exchangeDeclare("login","fanout");
// 临时队列
String queueName = channel.queueDeclare().getQueue();
// 绑定交换机和队列 队列名 交换机名 路由Key(下一个模型用到)
channel.queueBind(queueName, "login","");
// 消费消息
channel.basicConsume(queueName,true, new DefaultConsumer(channel){
public void handleDelivery(String consumerTag, Envelope envelope, AMQP.BasicProperties properties, byte[]body){
System.out.println("1收到新消息:" + new String(body));
}
});
}
}
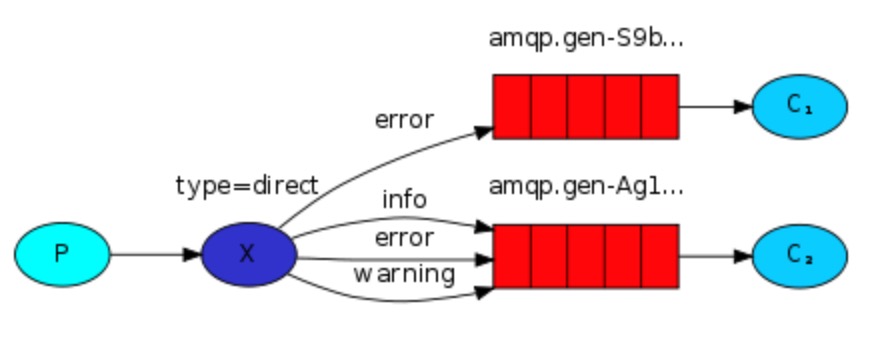
3.7 第四种模型(Routing)订阅模型——Direct(直连)
- 在某些场景下,我们希望不同的消息被不同的队列消费,就要用到Direct类型的交换机
- 需要指定一个 RoutingKey
- 交换机根据消息的 RoutingKey进行判断,只有队列的 RoutingKey 与消息的一致才会接收消息
-
P:生产者,向交换机发送消息,指定一个 RoutingKey
-
X:交换机,接收生产者消息,然后把消息传递给相应 RoutingKey 的队列
-
C1:消费者1,其所在队列指定了需要 RoutingKey 为 error 的消息
-
C2:消费者2,其所在队列制定了需要RoutingKey 为 info, error, warning 的消息
-
开发生产者
1
2
3
4
5
6
7
8
9
10
11
12
13
14
15public class Provider {
public static void main(String[] args) throws IOException {
// 获取连接对象
Connection connection = RabbitMQUtils.getConnection();
// 通过连接获取通道
Channel channel = connection.createChannel();
// 声明交换机 参数1:交换机名称 参数2:路由模式
channel.exchangeDeclare("ming", "direct");
// 发送消息
String routingKey = "info";
channel.basicPublish("ming", routingKey, null, ("direct模型发布routingKey为:"+routingKey).getBytes());
// 关闭资源
RabbitMQUtils.closeConnectionAndChannel(channel,connection);
}
} -
开发消费者
1
2
3
4
5
6
7
8
9
10
11
12
13
14
15
16
17
18
19
20
21
22
23
24
public class Consumer1 {
public static void main(String[] args) throws IOException {
Connection connection = RabbitMQUtils.getConnection();
Channel channel = connection.createChannel();
// 声明交换机及类型
channel.exchangeDeclare("ming","direct");
// 创建临时队列
String queue = channel.queueDeclare().getQueue();
// 基于路由Key绑定队列和交换机 参数:队列名 交换机名 路由Key
channel.queueBind(queue,"ming","warning");
channel.queueBind(queue,"ming","error");
// 消费消息
channel.basicConsume(queue, true, new DefaultConsumer(channel){
public void handleDelivery(String consumerTag, Envelope envelope, AMQP.BasicProperties properties, byte[]body){
System.out.println("1收到新消息:" + new String(body));
}
});
}
}
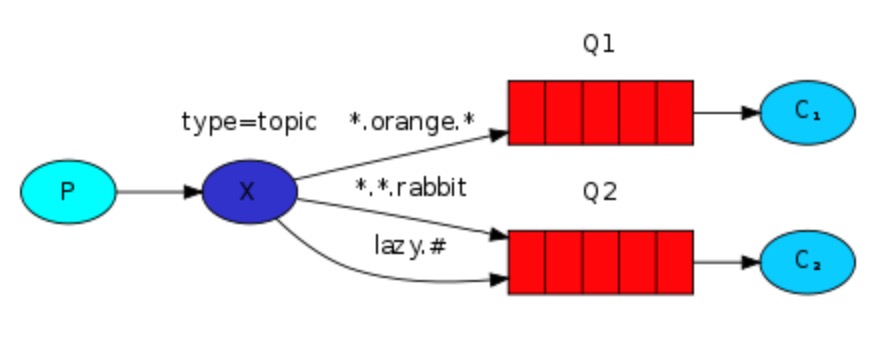
3.8 第四种模型(Routing)订阅模型——Topic
-
与Direct相比,Topic类型的交换机可以让队列在绑定 RoutingKey 时使用通配符
-
通配符规则
1
2
3
4
5
6* 匹配恰好一个词
# 匹配零个到多个词
例如
banana.* 可以匹配banana.book
banana.# 可以匹配banana.book或者banana.hello.world或者banana -
开发生产者
1
2
3
4
5
6
7
8
9
10
11
12
13
14
15
16
17public class Provider {
public static void main(String[] args) throws IOException {
Connection connection = RabbitMQUtils.getConnection();
Channel channel = connection.createChannel();
// 声明交换机及类型
channel.exchangeDeclare("topic_exchange","topic");
// 发布消息
String routingKey = "banana.book.hello";
channel.basicPublish("topic_exchange",routingKey,null,("topic动态路由模型,routingKey:"+routingKey).getBytes());
// 关闭资源
RabbitMQUtils.closeConnectionAndChannel(channel, connection);
}
} -
开发消费者
1
2
3
4
5
6
7
8
9
10
11
12
13
14
15
16
17
18
19
20
21
22
23
24
public class Consumer1 {
public static void main(String[] args) throws IOException {
Connection connection = RabbitMQUtils.getConnection();
Channel channel = connection.createChannel();
// 声明交换机及类型
channel.exchangeDeclare("topic_exchange","topic");
// 创建临时队列
String queueName = channel.queueDeclare().getQueue();
// 绑定队列和交换机 动态通配符形式
channel.queueBind(queueName,"topic_exchange","banana.*");
// 消费消息
channel.basicConsume(queueName,true,new DefaultConsumer(channel){
public void handleDelivery(String consumerTag, Envelope envelope, AMQP.BasicProperties properties, byte[]body){
System.out.println("1收到新消息:" + new String(body));
}
});
}
}
4. 在SpringBoot中使用
基于AMQP(Advanced Message Queuing Protocol,高级消息队列协议,应用间消息传递的一种协议,与平台和语言无关)
4.1 准备与配置
-
第一步:添加依赖
1
2
3
4<dependency>
<groupId>org.springframework.boot</groupId>
<artifactId>spring-boot-starter-amqp</artifactId>
</dependency> -
第二步:配置application.yml(按照实际情况填)
1
2
3
4
5
6
7spring:
rabbitmq:
host: 192.168.115.100
port: 5672
username: prod
password: 123456
virtual-host: /prod
4.2 第一种模型(直连)
-
生产者
1
2
3
4
5
6
7
8
9
10
11
12
13
14
public class TestRabbitMQ {
// 注入rabbitTemplate
private RabbitTemplate rabbitTemplate;
// HelloWorld模型测试
public void test(){
rabbitTemplate.convertAndSend("hello","hello world"); // 队列名 消息
}
} -
消费者
1
2
3
4
5
6
7
8// 默认持久化 非独占 不自动删除队列
public class HelloConsumer {
public void receive(String message){
System.out.println("message:"+message);
}
} -
容易出现的错误:发送用原生代码,接收用AMQP时消费者报错,
Caused by: com.fasterxml.jackson.core.JsonParseException: Unrecognized token ‘xxx‘,这是因为Jackson类型转换失败,它有严格的转换规范,发送者发送到queue的信息格式不对,String类型数据要加上双引号。1
2
3// 4.发送消息要加上双引号,如下所示
String message = "\"hello, rabbitmq!\"";
channel.basicPublish("", queueName, null, message.getBytes());
4.3 第二种模型(work queue)
-
生产者
1
2
3
4
5
6
7// work模型测试
public void testWork(){
for(int i=1; i<=10; i++){
rabbitTemplate.convertAndSend("work","work模型"+i);
}
} -
消费者
1
2
3
4
5
6
7
8
9
10
11
12
13
14
15
16
public class WorkConsumer {
// 第一个消费者
public void receive1(String message){
System.out.println("message1:"+message);
}
// 第二个消费者
public void receive2(String message){
System.out.println("message2:"+message);
}
} -
多劳多得的设置方法(消费预取限制)
要在application.yml中设置
spring.rabbitmq.listener.simple.prefetch,可以控制预取消息的上限。
4.4 第三种模型(fanout 广播)
-
生产者
1
2
3
4
5// fanout 广播模型测试
public void testFanout(){ // 交换机名 路由Key 消息
rabbitTemplate.convertAndSend("logs","","Fanout模型发送的消息");
} -
消费者
1
2
3
4
5
6
7
8
9
10
11
12
13
14
15
16
17
18
19
20
21
22
public class FanoutConsumer {
public void receive1(String message){
System.out.println("message1:"+ message);
}
public void receive2(String message){
System.out.println("message2:"+ message);
}
} -
消费者(配置文件类方式绑定交换机与队列)
1
2
3
4
5
6
7
8
9
10
11
12
13
14
15
16
17
18
19
20
21
22
23
24
25
26
27public class FanoutConfig{
// 交换机:515code.fanout
public FanoutExchange fanoutExchange(){
return new FanoutExchange("515code.fanout")
}
// 队列1:fanout.queue1
public Queue fanoutQueue1(){
return new Queue("fanout.queue1");
}
// 绑定队列1到交换机
public Binding fanoutBinding1(Queue fanoutQueue1, FanoutExchange fanoutExchange){
return BindingBuilder.bind(fanoutQueue1).to(fanoutExchange);
}
// 队列2:fanout.queue2
public Queue fanoutQueue2(){
return new Queue("fanout.queue2");
}
// 绑定队列2到交换机
public Binding fanoutBinding2(Queue fanoutQueue2, FanoutExchange fanoutExchange){
return BindingBuilder.bind(fanoutQueue2).to(fanoutExchange);
}
}
4.5 第四种模型(Routing)订阅模型——Direct(直连)
-
生产者
1
2
3
4
5// route 路由模式
public void testRoute(){
rabbitTemplate.convertAndSend("direct_exchange","info","发送路由key为info的信息");
} -
消费者
1
2
3
4
5
6
7
8
9
10
11
12
13
14
public class RouteConsumer {
public void receive1(String message){
System.out.println("message1:"+message);
}
}
4.6 第四种模型(Routing)订阅模型——Topic
-
生产者
1
2
3
4
5// Topic 动态路由 订阅模式
public void testTopic(){
rabbitTemplate.convertAndSend("topic_exchange","banana.book","banana.book路由信息");
} -
消费者
1
2
3
4
5
6
7
8
9
10
11
12
13
public class TopicConsumer {
public void receive1(String message){
System.out.println(message);
}
}
5. 消息转换器
选中rabbitTemplate.convertAndSend方法,在IDEA中使用Cmd+P快捷键,可以查看参数列表。我们发现传送的消息实际上是Object类型。
发送一个对象消息试试:
1 |
|
在RabbitMQ中查看消息如下所示:
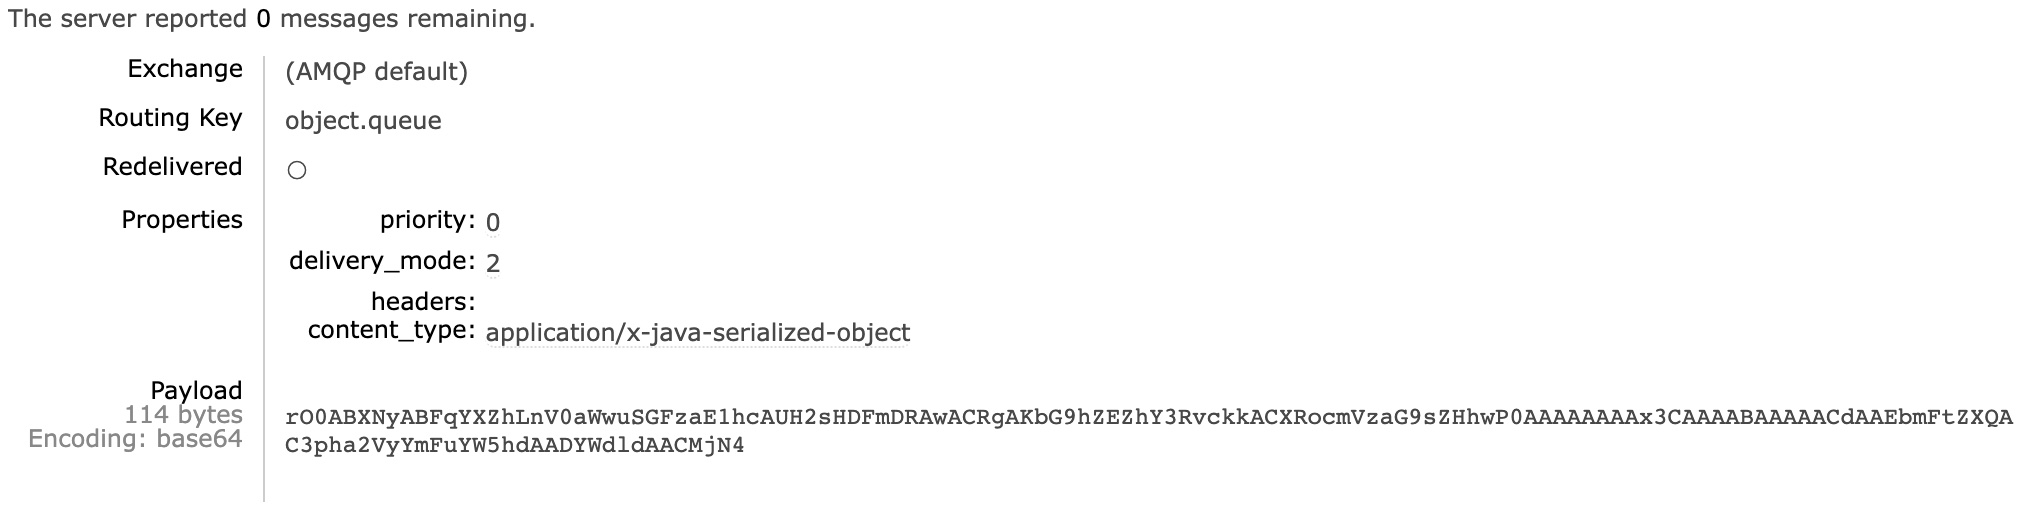
Payload会变得很长,且这种原生序列化方式存在注入的安全问题。
Spring对消息对象的处理是由org.springframework.amqp.support.converter.MessageConverter来处理的。
默认实现是SimpleMessageConverter,基于JDK的ObjectOutputStream完成序列化。
推荐改为JSON方式序列化,首先引入依赖:
1 | <dependency> |
然后在发布者和接收者服务中声明(双方要使用相同的MessageConverter):
1 |
|
6. 应用场景
6.1 异步处理
例如:用户注册后,利用消息队列分发任务(无需等待返回结果),同时发送邮件和短信验证(并行方式),提高处理的效率。
6.2 应用解耦
例如:用户网购下单,订单系统通知库存系统,传统方式为订单系统直接调用库存系统接口。
但是如果库存系统出现故障,下单会失败。
为了这两个系统之间解耦,可以引入消息队列,订单系统向队列写入消息,库存系统向队列订阅消息。
这样一来,就算系统故障,也能保证消息不会丢失。
6.3 流量削峰
例如:秒杀商品活动,容易因为流量过大导致应用宕机。
可以在秒杀业务系统前加入消息队列,超过消息队列长度最大值的用户请求直接跳转到错误界面。
最后,系统根据消息队列中的请求信息再做处理。
 wechat
 alipay