参考资料:
[1] MIT-6.S081
https://pdos.csail.mit.edu/6.828/2021/schedule.html
[2] XV6
https://pdos.csail.mit.edu/6.828/2021/xv6/book-riscv-rev2.pdf
[3] X86 assembly
https://pdos.csail.mit.edu/6.828/2018/readings/pcasm-book.pdf
遇到不明白的函数,可以登录到Linux上使用man指令查询,例如man 2 write来查询write函数。
一. 准备
1.1 概念
目的:认识 x86 汇编语言和 PC 引导过程,并开始使用 QEMU 和 QEMU/GDB 调试。
QEMU(虚拟机):是纯软件实现的虚拟化模拟器,可以模拟硬件设备。
GNU:操作系统,名称来自GNU’s Not Unix!的递归缩写,因为GNU的设计类似Unix,但它不包含具著作权的Unix代码。Linux只是一个内核,而GNU/Linux才是整个系统。
GDB:“GDB 全称“GNU symbolic debugger ”,从名称上不难看出,它诞生于 GNU 计划(同时诞生的还有 GCC、Emacs 等),是 Linux 下常用的程序调试器。
1.2 环境配置
6.828 安装方法
实验环境:Linux VM-8-11-centos 3.10.0-1160.66.1.el7.x86_64
克隆实验代码
1 git clone https://pdos.csail.mit.edu/6.828/2018/jos.git lab
编译工具链
1
2
gcc -m32 -print-libgcc-file-name
QEMU模拟器
1 2 3 4 5 6 7 8 9 10 git clone https://github.com/mit-pdos/6.828-qemu.git qemu ./configure --disable-kvm --target-list="i386-softmmu x86_64-softmmu" make && make install make make qemu
6.S081 安装方法
实验环境:MacBook Pro(14英寸,2021年)/ Apple M1 Pro
对于Ubuntu等Debian系Linux,参考官方资料即可。
1
2
3
sudo apt-get install git build-essential gdb-multiarch qemu-system-misc gcc-riscv64-linux-gnu binutils-riscv64-linux-gnu git clone git://g.csail.mit.edu/xv6-labs-2021
对于macOS(包括arm),使用Docker:
1 2 3 4 5 6 7 8 9 10 sudo docker pull linxi177229/mit6.s081:latest sudo docker run --name mit6.s081 -itd linxi177229/mit6.s081 git clone git://g.csail.mit.edu/xv6-labs-2021 cd xv6-labs-2021git checkout util make qemu
如果要下载软件,需要更新下清华的镜像源(https://blog.csdn.net/qq_57171795/article/details/123109463)
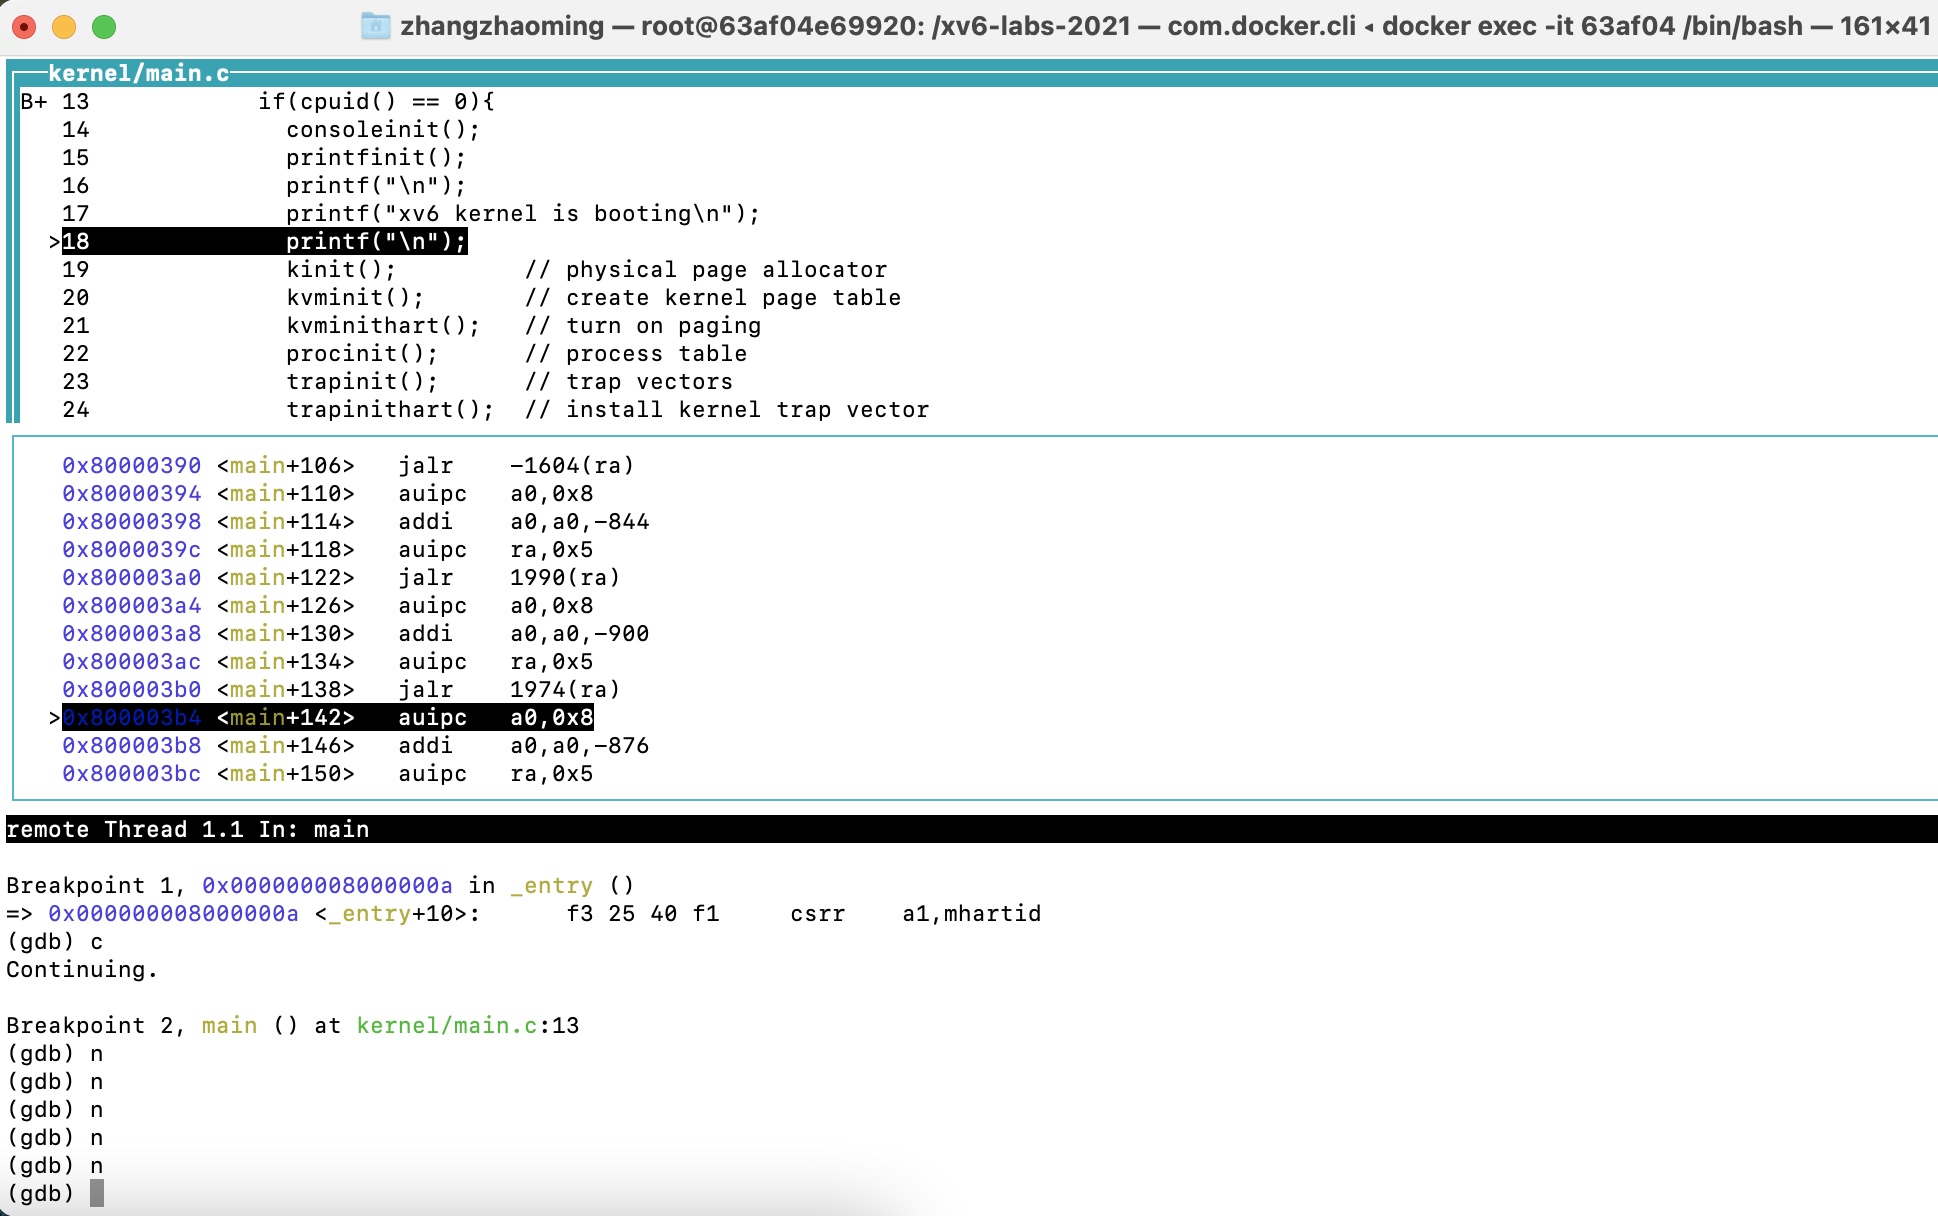
1.3 GDB调试
不推荐,不是很方便。
1 2 3 4 5 6 7 8 9 10 11 12 13 14 15 16 echo "add-auto-load-safe-path $(pwd) /.gdbinit " >> ~/.gdbinitmake CPUS=1 qemu-gdb gdb-multiarch b _entry si layout split b main c n
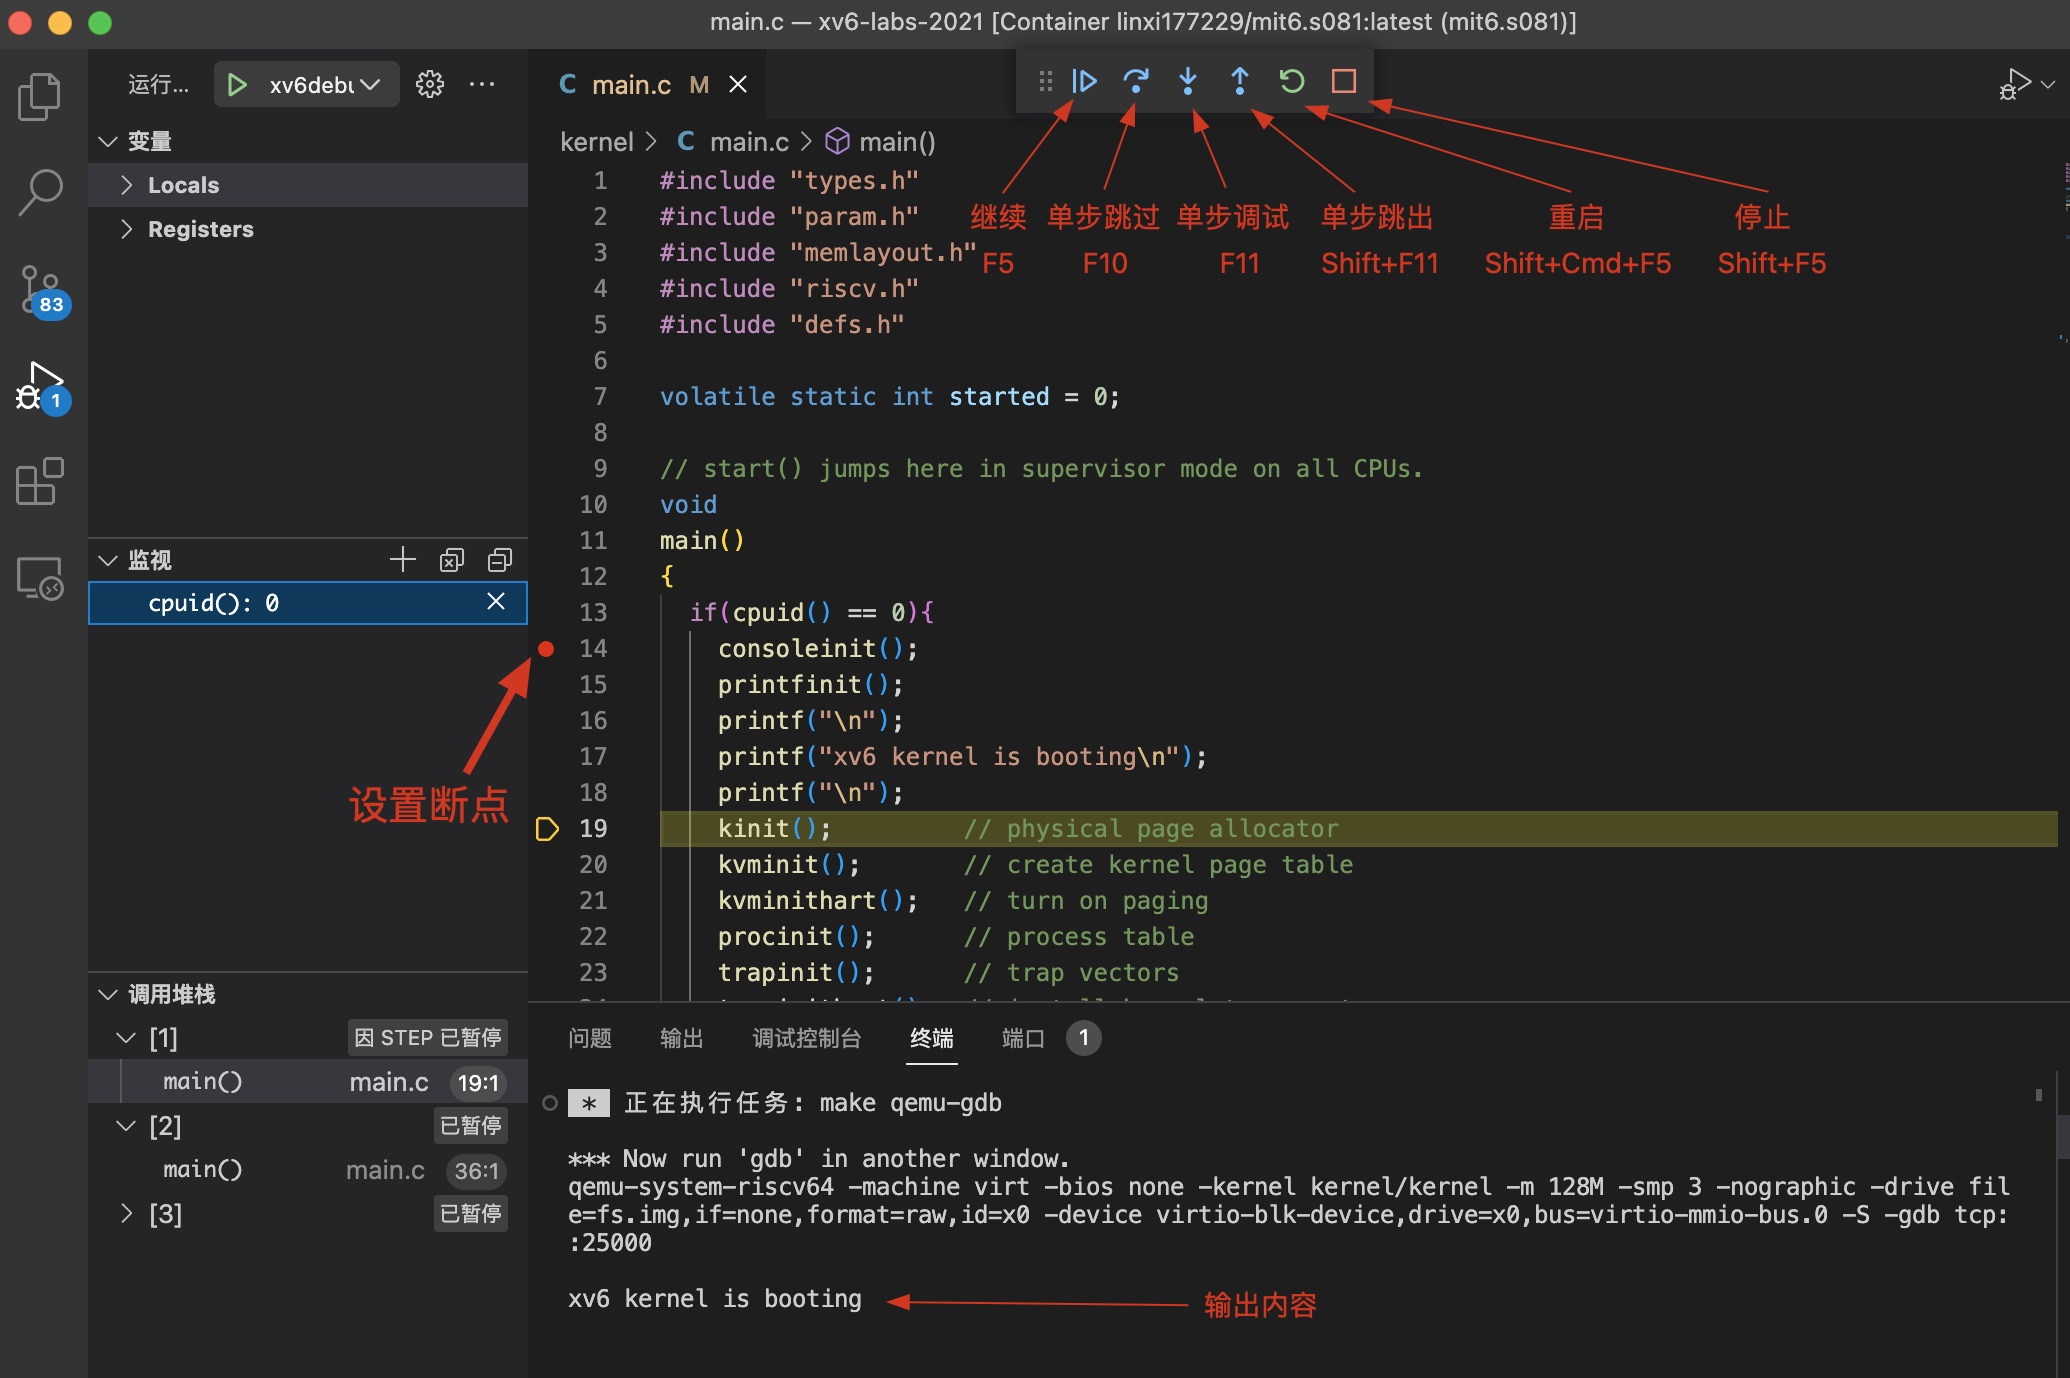
1.4 VSCode调试
1.4.1 配置
比较推荐,功能更全。
首先在xv6-labs-2021目录下创建.vscode文件夹,在这个文件夹下新建launch.json、tasks.json,内容分别如下:
1 2 3 4 5 6 7 8 9 10 11 12 13 14 15 16 17 18 19 20 21 22 23 24 25 26 27 28 29 30 31 32 33 34 35 36 37 38 39 40 41 42 43 44 45 46 47 48 49 50 51 52 53 54 { "version" : "0.2.0" , "configurations" : [ { "name" : "xv6debug" , "type" : "cppdbg" , "request" : "launch" , "program" : "${workspaceFolder}/kernel/kernel" , "stopAtEntry" : true , "cwd" : "${workspaceFolder}" , "miDebuggerServerAddress" : "127.0.0.1:25000" , "miDebuggerPath" : "/usr/bin/gdb-multiarch" , "MIMode" : "gdb" , "preLaunchTask" : "xv6build" } ] } { "version" : "2.0.0" , "options" : { "cwd" : "${workspaceFolder}" } , "tasks" : [ { "label" : "xv6build" , "type" : "shell" , "isBackground" : true , "command" : "make qemu-gdb" , "problemMatcher" : [ { "pattern" : [ { "regexp" : "." , "file" : 1 , "location" : 2 , "message" : 3 } ] , "background" : { "beginsPattern" : ".*Now run 'gdb' in another window." , "endsPattern" : "." } } ] , "group" : { "kind" : "build" , "isDefault" : true } } ] }
然后进行调试测试,我们可以找到 kernel/main.c 下的第13行,打一个断点,然后按F5。
错误1:如果出现 /Program path 'xv6-labs-2021/kernel/kernel' is missing or invalid 错误,先不用管,等待终端的gdb跑起来。
错误2:如果出现 Unexpected GDB output from command "-target-select remote 127.0.0.1:25000". Remote communication error. Target disconnected.: Connection reset by peer. 错误,需要在xv6-labs-2021下找到.gdbinit文件,注释掉target remote这行:
1 2 3 4 5 6 set confirm off set architecture riscv:rv64 # target remote 127.0.0.1:25000 symbol-file kernel/kernel set disassemble-next-line auto set riscv use-compressed-breakpoints yes
注意1:如果make clean后再按F5(它会执行make qemu-gdb),.gdbinit这个文件会被刷新,所以我们又要去注释掉target remote那行,然后再按F5,目前我还没找到更好的解决方法。
注意2:由于xv6默认多核运行,所以调试代码的时候可能会有点混乱,可以通过修改tasks.json中command字段为make qemu-gdb CPUS=1,即单核运行。这仅供调试使用,因为正常情况下代码要通过多核的运行。
下面是运行调试后的界面:
1.4.2 用户程序调试
我们在Lab中要编写用户程序,因此下面介绍如何调试(以user/ls.c文件为例)。
STEP1:在user/ls.c中main函数的某一行打上断点
STEP2:按F5进入调试模式,点击 调试控制台 输入:-exec file ./user/_ls
STEP3:点击调试工具的运行按钮,并在终端输入ls命令
然后VSCode会自动停在断点处,我们就可以对其进行调试了。
二. Lab: Xv6 and Unix utilities
2.1 启动 Xv6
该小节我们将启动这个xv6操作系统,如下。
1 2 3 cd xv6-labs-2021/ make clean make qemu
此外,在VSCode上安装Docker插件、Remote-SSH和Remote Explorer,然后进入容器中,方便后续编写代码。
2.2 实现 sleep 命令
在开始前,我们先要回顾下C语言main函数的参数列表:int main(int argc, char* argv[]) 或者 int main(int argc, char** argv)
argc是程序运行时发给main函数的命令行参数个数,而后面的argv[]是字符指针数组,数组中每个元素是字符指针,指向每个参数的第一个字符(例如argv[1]指向可执行程序后第一个字符串)。
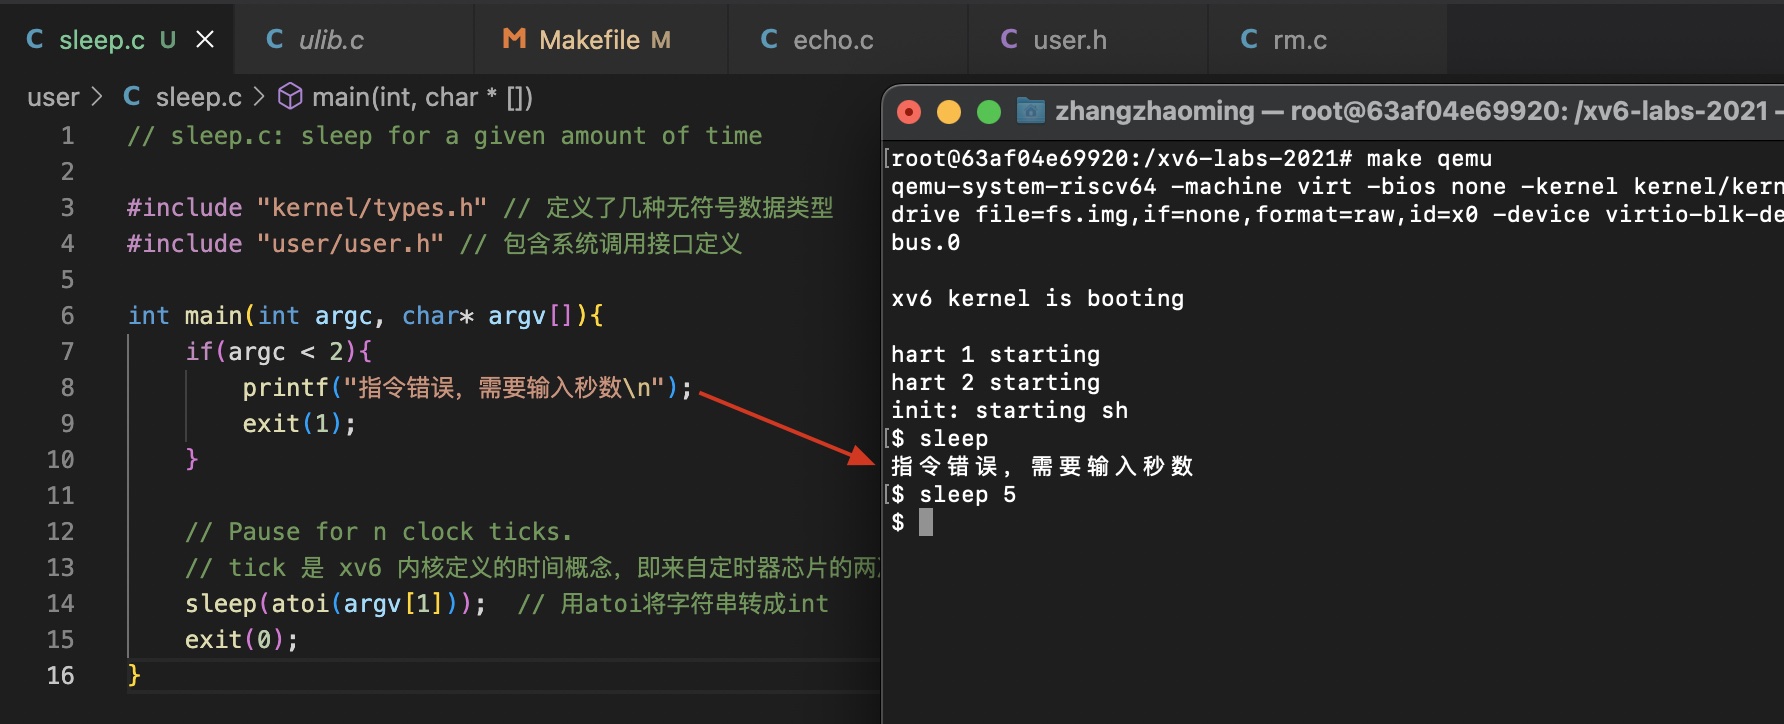
根据课程提示,参照 echo.c / grep.c / rm.c,然后要在 user/sleep.c 中编写代码。
1 2 3 4 5 6 7 8 9 10 11 12 13 14 #include "kernel/types.h" #include "user/user.h" int main (int argc, char * argv[]) { if (argc < 2 ){ printf ("指令错误,需要输入参数\n" ); exit (1 ); } sleep(atoi(argv[1 ])); exit (0 ); }
然后查找UPROGS,定位到Makefile文件,添加 $U/_sleep\。重新make qemu,执行sleep命令如下所示。
通过上面的例子,我们可以掌握如何从命令行获取参数,并进行系统调用。
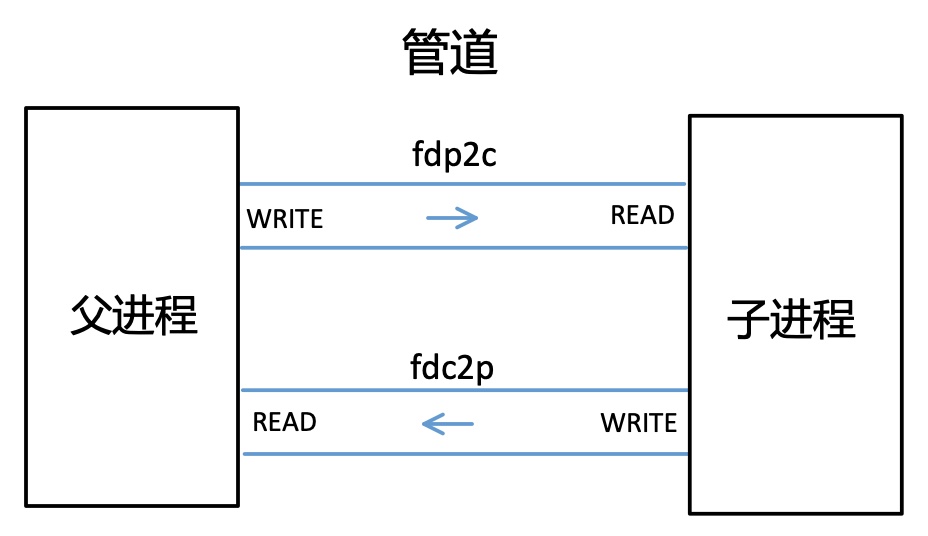
2.3 实现 pingpong 命令
要提前了解 pipe / fork / read / write的用法。
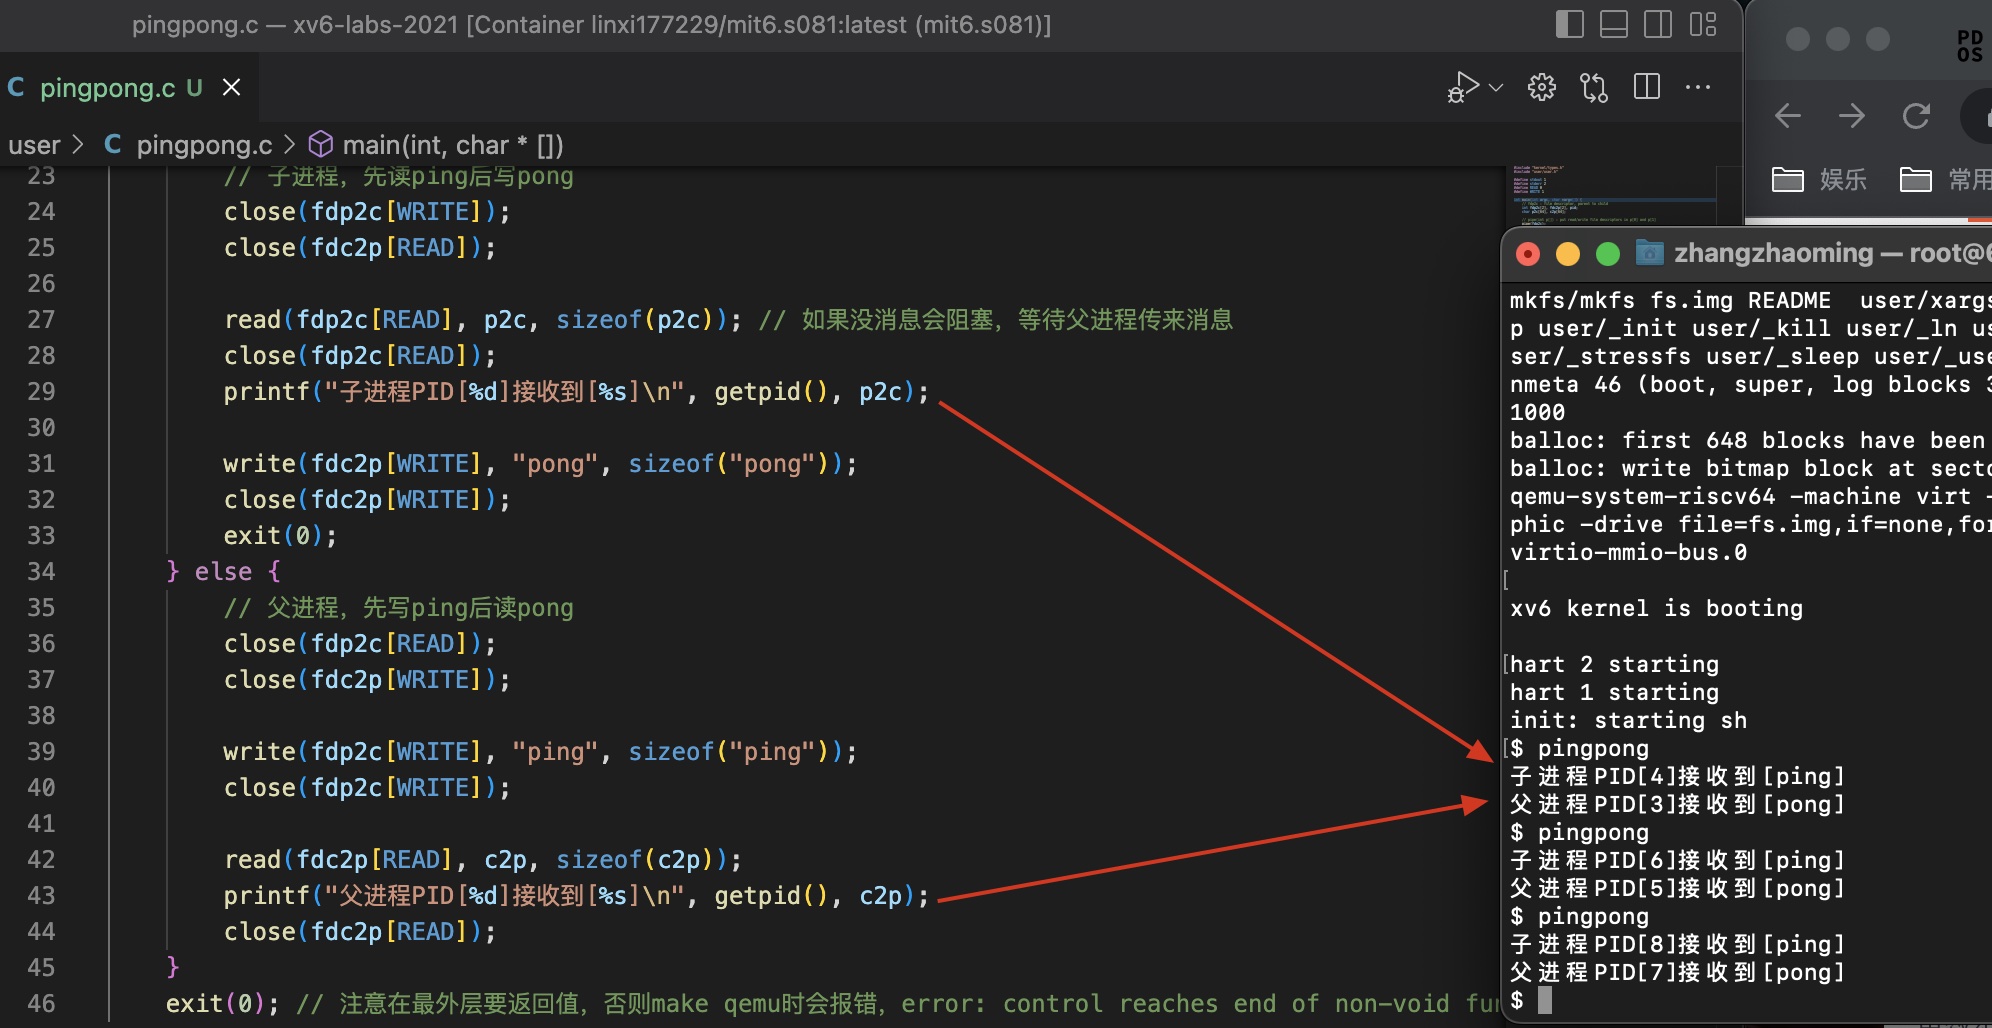
1 2 3 4 5 6 7 8 9 10 11 12 13 14 15 16 17 18 19 20 21 22 23 24 25 26 27 28 29 30 31 32 33 34 35 36 37 38 39 40 41 42 43 44 45 46 47 #include "kernel/types.h" #include "user/user.h" #define stdout 1 #define stderr 2 #define READ 0 #define WRITE 1 int main (int argc, char *argv[]) { int fdp2c[2 ], fdc2p[2 ], pid; char p2c[64 ], c2p[64 ]; pipe(fdp2c); pipe(fdc2p); pid = fork(); if (pid < 0 ) { fprintf (stderr , "fork执行错误,pid小于0!\n" ); } else if (pid == 0 ) { close(fdp2c[WRITE]); close(fdc2p[READ]); read(fdp2c[READ], p2c, sizeof (p2c)); close(fdp2c[READ]); printf ("子进程PID[%d]接收到[%s]\n" , getpid(), p2c); write(fdc2p[WRITE], "pong" , sizeof ("pong" )); close(fdc2p[WRITE]); exit (0 ); } else { close(fdp2c[READ]); close(fdc2p[WRITE]); write(fdp2c[WRITE], "ping" , sizeof ("ping" )); close(fdp2c[WRITE]); read(fdc2p[READ], c2p, sizeof (c2p)); printf ("父进程PID[%d]接收到[%s]\n" , getpid(), c2p); close(fdc2p[READ]); } exit (0 ); }
运行效果如下图所示:
要注意的点:
管道是单向的,一端读一端写。
read函数是阻塞的,所以一定是子进程先打印,再到父进程打印(多品几次代码就懂了)。
2.4 实现primes命令
1 2 3 4 5 6 7 8 9 10 11 12 13 14 15 16 17 18 19 20 21 22 23 24 25 26 27 28 29 30 31 32 33 34 35 36 37 38 39 40 41 42 43 44 45 46 47 48 49 50 51 52 53 54 55 56 57 58 59 60 61 62 63 64 65 66 67 68 69 70 71 72 73 74 75 76 #include "kernel/types.h" #include "user/user.h" #define READ 0 #define WRITE 1 #define stdin 0 #define stdout 1 #define stderr 2 void handlePrime (int *left) { close(left[WRITE]); int right[2 ], tmp, prime; if (read(left[READ], &prime, sizeof (int )) == 0 ) { close(left[READ]); exit (0 ); } fprintf (stdout , "prime %d\n" , prime); pipe(right); int pid = fork(); if (pid < 0 ){ fprintf (stderr , "handlePrime中fork错误!\n" ); close(right[READ]); close(right[WRITE]); close(left[READ]); exit (1 ); }else if (pid > 0 ){ close(right[READ]); while (read(left[READ], &tmp, sizeof (int ))){ if (tmp % prime == 0 ) continue ; write(right[WRITE], &tmp, sizeof (int )); } close(right[WRITE]); wait(0 ); exit (0 ); }else { handlePrime(right); exit (0 ); } } void main (int argc, char *argv[]) { int pd_pair[2 ]; pipe(pd_pair); int pid = fork(); if (pid < 0 ){ fprintf (stderr , "main中fork错误!\n" ); close(pd_pair[READ]); close(pd_pair[WRITE]); exit (1 ); }else if (pid > 0 ){ close(pd_pair[READ]); for (int i = 2 ; i <= 35 ; i++) { write(pd_pair[WRITE], &i, sizeof (int )); } close(pd_pair[WRITE]); wait(0 ); exit (0 ); }else { handlePrime(pd_pair); exit (0 ); } }
如上述代码所示,main函数开辟了一个管道,父进程向管道写2到35,子进程去调用handlePrime来处理质数。
handlePrime中采用了递归的方法来判别是否为质数,大概流程如下:
2为质数,打印,然后判断3、4、5、…、35能否被2整除,不能被整除的写入right管道,递归。
3为质数,打印,然后判断5、7、9、…、35能否被3整除,不能被整除的写入right管道,递归。
一直往下执行,就可以把所有质数打印出来了。
 wechat
 alipay