一. 概述与快速安装
ElasticSearch是一个开源的高拓展的分布式全文检索引擎 ,拓展性好,基于Lucene进行封装和实现。
ELK技术:ElasticSearch+Logstash+Kibana,数据清洗、过滤、可视化的大数据技术。
ElasticSearch(ES)与Solr比较:
对已有数据进行搜索,solr 更快
当实时建立索引,Solr会产生io阻塞,性能较差,ES 更快
随着数据量增加,Solr效率会降低,ES 更快
下载与安装 学习版本7.x
ElasticSearch: https://mirrors.huaweicloud.com/elasticsearch/?C=N&O=D https://mirrors.huaweicloud.com/logstash/?C=N&O=D https://mirrors.huaweicloud.com/kibana/?C=N&O=D
可视化ES-head插件:https://github.com/mobz/elasticsearch-head
ElasticSearch安装 7.8.2 开箱即用
目录
1
2
3
4
5
6
7
8
bin 启动文件 config 配置文件 log4j2.properties 日志文件 jvm.options java虚拟机相关配置 elasticsearch.yml es的配置文件 lib 相关jar包 modules 功能模块 plugins 插件
启动(执行bin目录下的elasticsearch脚本),访问9200端口
安装可视化插件 head
1 2 3 npm install npm run start
启动,访问9100端口,但是要连接到9200会跨域,解决方法:
在elasticsearch.yml配置文件中写入以下内容
1
2
http.cors.enabled: true http.cors.allow-origin: "*"
Kibana安装 7.8
Kibana是一个针对ElasticSearch的开源分析及可视化平台。
下载好后解压,进入bin目录执行kibana脚本,访问5601端口即可
测试工具:Managerment -> Dev Tools
使用Docker快速安装ES + Kibana
1
2
3
4
5
6
7
8
9
10
11
12
13
14
15
16
17
18
docker run -d \ --name es \ -e "ES_JAVA_OPTS=-Xms512m -Xmx512m" \ -e "discovery.type=single-node" \ -v es-data:/usr/share/elasticsearch/data \ -v es-plugins:/usr/share/elasticsearch/plugins \ --privileged \ --network bananaNet \ -p 9200:9200 \ -p 9300:9300 \ elasticsearch:7.12.1 docker run -d \ --name kibana \ -e ELASTICSEARCH_HOSTS=http://es:9200 \ --network=bananaNet \ -p 5601:5601 \ kibana:7.12.1
二. ES核心概念
首先,ElasticSearch面向文档 ,一切都是JSON,它与关系数据库的对比如下
关系数据库
ElasticSearch
数据库(database)
索引(indices)
表(tables)
types (即将过时)
行(rows)
documents
字段(columns)
fields
物理设计:
ElasticSearch在后台把每个索引划分为多个分片,每片分片可以在集群中的不同服务器间迁移
逻辑设计:
一个索引类型包含多个文档
文档
索引和搜索数据的最小单位是文档,其实对应的就是数据,例如:
1
2
3
user 1 banana 23 2 apple 18
文档数据会被序列化为JSON格式后存储在ES中。
类型
是文档的逻辑容器,提前定义好文档对应的数据类型,若不设置会自动转换。
索引
是一个很大的文档集合(相同类型的文档的集合 ),存储了映射类型的字段和其他设置,然后保存到各个分片上。
倒排索引
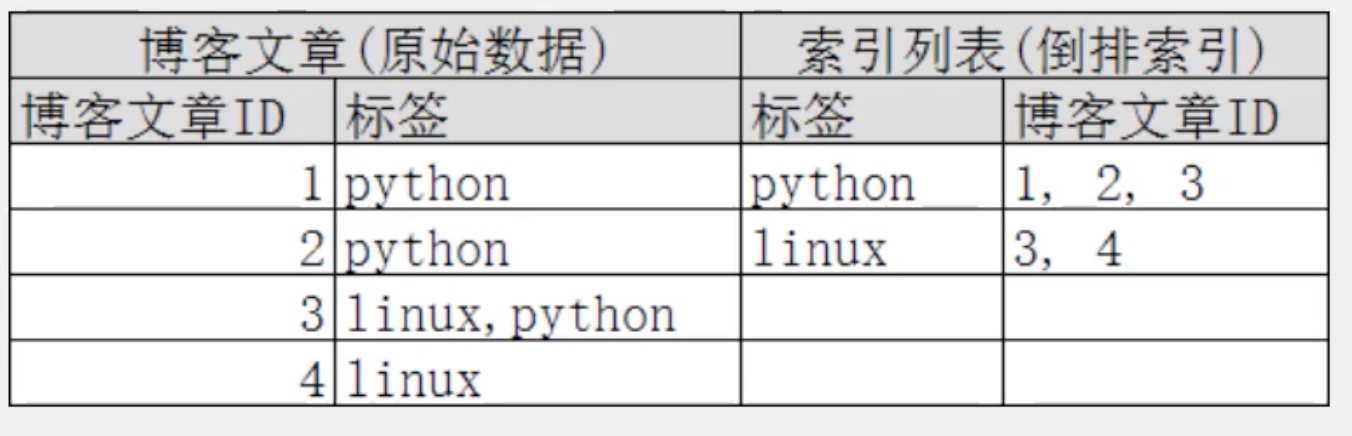
倒排索引的概念是相对MySQL中正向索引来说的。
正向索引:基于id创建索引,查词条时需要先找到文档,再查询是否包含要查找的内容。
倒排索引:对文档内容分词形成词条,然后对词条建立索引,并记录词条所在的文档id。查找时先通过词条找到文档id,再通过文档id找到文档(两次查询,比逐条查询内容效率高)。
例如:有两段文本,为其每个单词添加一个索引,最后搜索单词的时候查询索引个数即可。
三. IK分词器
分词:把一段中文划分成一个个关键词,在搜索时把信息进行分词,然后进行匹配操作
IK分词器提供了两个算法:ik_smart和ik_max_word
安装 注意版本和ES对应
下载地址:https://github.com/medcl/elasticsearch-analysis-ik
放入elasticsearch目录 -> plugins文件夹即可
或者在bin目录使用下列命令安装
1 ./elasticsearch-plugin install file:///usr/share/elasticsearch/temp/elasticsearch-analysis-ik-7.13.4.zip
使用Kibana测试分词器效果
其中ik_smart为最少切分 ,ik_max_word为最细粒度划分
1
2
3
4
5
6
7
8
9
10
11
GET _analyze { "analyzer" : "ik_smart" , "text" : "华为P20手机" } GET _analyze { "analyzer" : "ik_max_word" , "text" : "华为P20手机" }
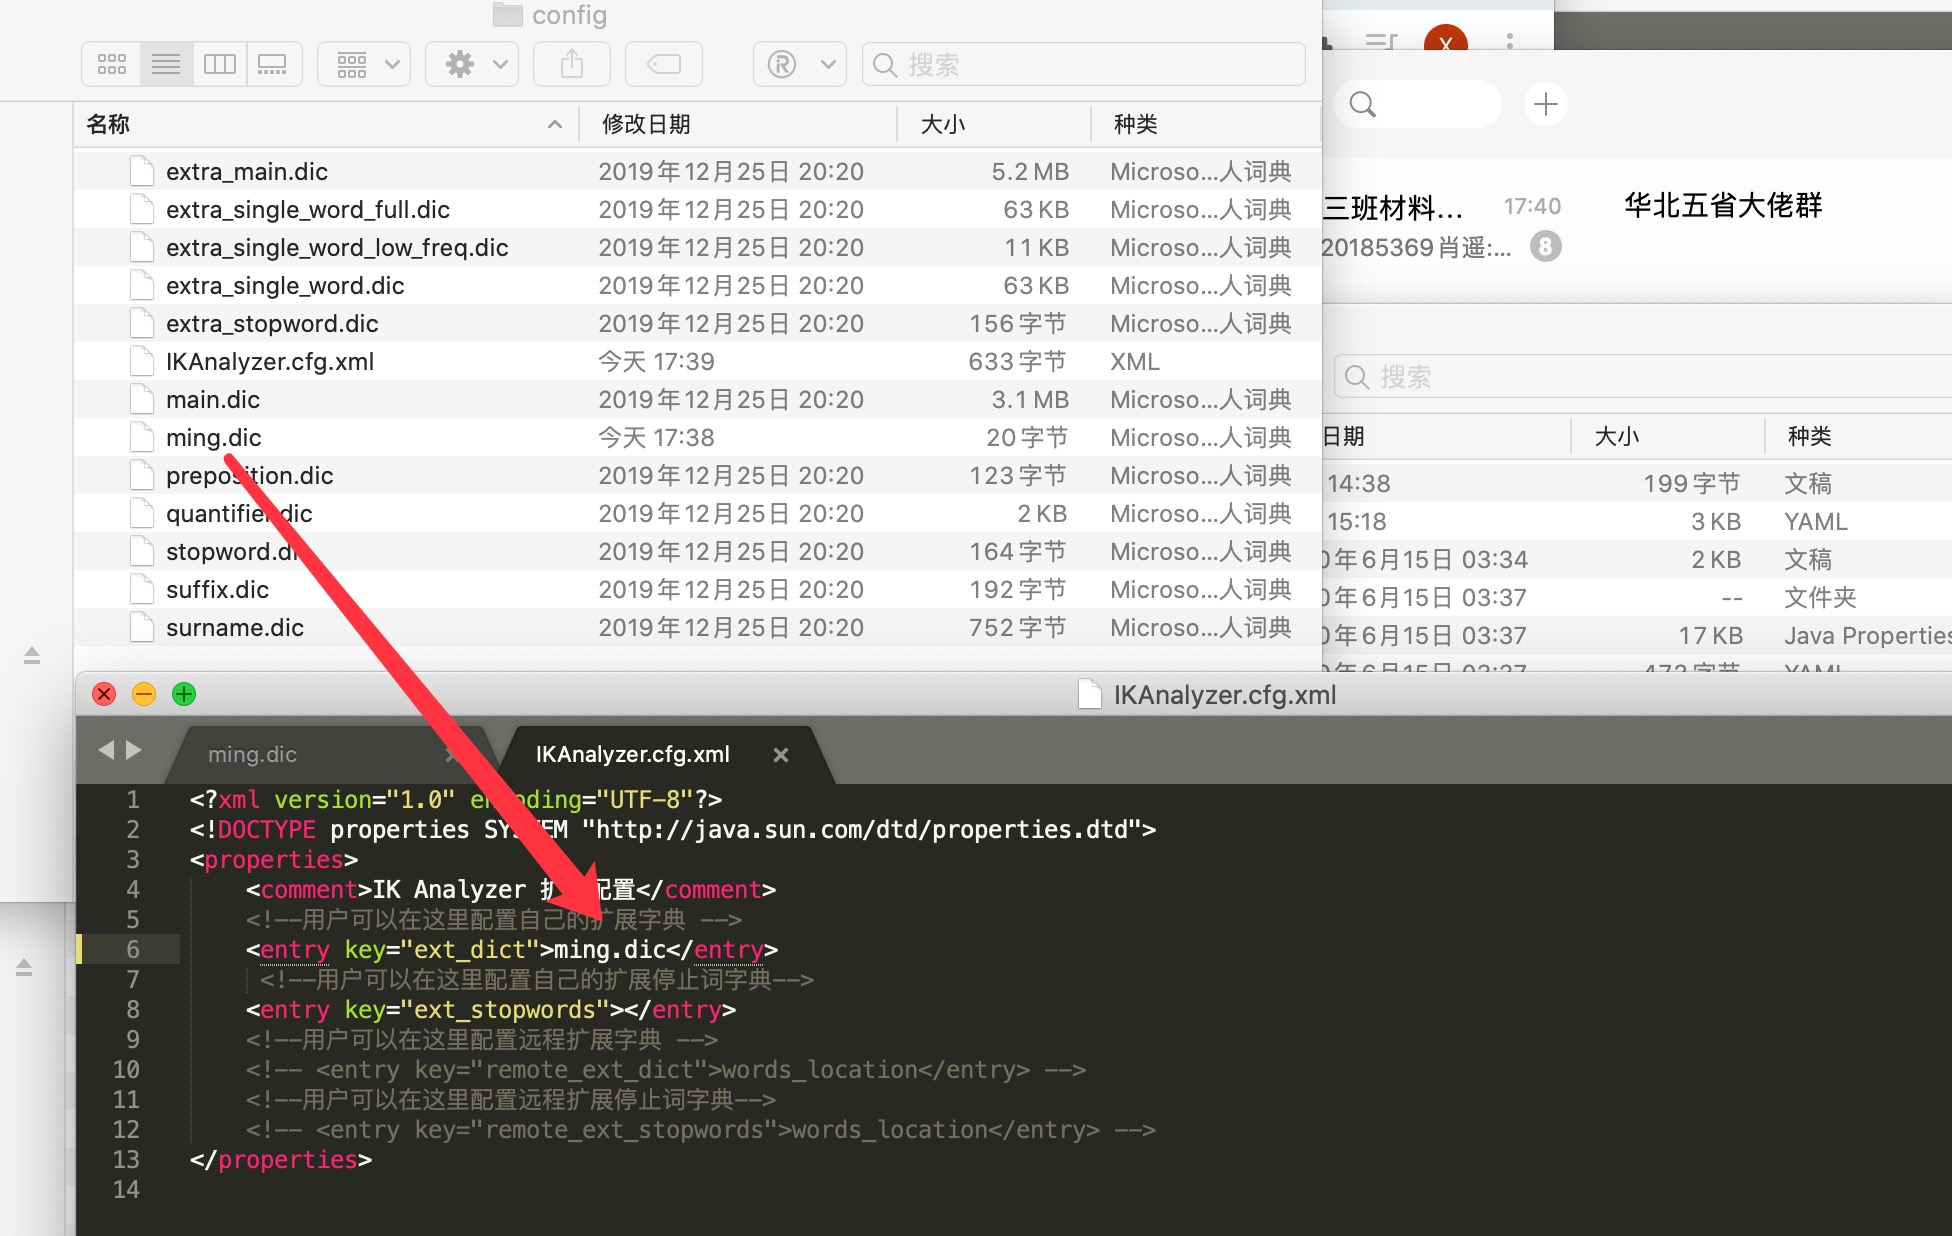
如果是特殊的词组,不想被拆分,需要自己加到分词器字典中
ik分词器添加配置
在ik分词器目录 -> config -> IKAnalyzer.cfg.xml中配置,可以创建自己的词典文件,将特定词组加进去即可
四. 关于索引的基本操作
mapping常见属性
type:数据类型
index:是否倒排索引
analyzer:分词器
properties:子字段
基本数据类型(type)
字符串类型:text / keyword(不可切割)
数值类型:long / integer / short / byte / double / float / half float / scaled float
日期类型:date
布尔类型:boolean
二进制类型:binary
对象:object
更多查看官方文档:https://www.elastic.co/guide/en/elasticsearch/reference/current/mapping-types.html
增加索引
即类型映射,相当于在MySQL中建立表,以创建test2和515code索引库为例:
1
2
3
4
5
6
7
8
9
10
11
12
13
14
15
16
17
18
19
20
21
22
23
24
25
26
27
28
29
30
31
32
33
34
35
36
37
38
39
40
41
42
43
44
PUT /test2 { "mappings" : { "properties" : { "name" : { "type" : "text" } , "age" : { "type" : "long" } , "birthday" : { "type" : "date" } } } } PUT /515 code { "mappings" : { "properties" : { "info" : { "type" : "text" , "analyzer" : "ik_smart" , "index" : "true" } , "email" : { "type" : "keyword" , "index" : "false" } , "name" : { "type" : "object" , "properties" : { "firstname" : { "type" : "keyword" } , "secondname" : { "type" : "keyword" } } } } } }
添加新字段
1
2
3
4
5
6
7
8
PUT /索引名/_mapping { "properties" : { "新字段名" : { "type" : "integer" } } }
删除索引
查询索引信息
查询更多信息
五. 关于文档的基本操作
增加文档
1
2
PUT /{ index} /{ type} /{ id} { 请求体}
上述方法已经过时,新版本中不再加入自定义类型 (type) 名,可以使用官方推荐的默认方式:
1
2
PUT /{ index} /_doc/{ id} { 请求体}
上面的doc为官方默认类型名,例如:
1
2
3
4
5
6
PUT /test3/_doc/1 { "name" : "BA_NANA" , "age" : 19 , "birthday" : "2000-01-01" }
删除文档
1 DELETE /{ index} /_doc/{ id}
修改文档
方法一(全量修改):再次进行PUT/POST操作,覆盖原数据即达到更新目的
方法二(局部修改):官方推荐写法
1 POST /{ index} /_update/{ id}
例如:
1
2
3
4
5
6
POST /test3/_update/1 { "doc" : { "name" : "扎克蕉" } }
查询文档
条件查询
1
2
3
GET /{ index} /_search?q=key: value GET /banana/_search?q=name: BA_NANA
这里要注意,如果key是keyword类型的是不会切割查询的,即搜索 BA_N 无法查到 BA_NANA
六. 复杂搜索
单条件匹配查询
加入 query 参数
1
2
3
4
5
6
7
8
GET /{ index} /_search { "query" : { "match" : { "{key}" : "{value}" } } }
指定分词器
1
2
3
4
5
6
7
8
9
10
11
GET /jd_goods/_search { "query" : { "match" : { "{key}" : { "query" : "java核心技术" , "analyzer" : "ik_smart" } } } }
指定字段查询
加入 _source 参数,则仅在给出的字段名中进行匹配
1
2
3
4
5
6
7
8
9
GET /{ index} /_search { "query" : { "match" : { "{key}" : "{value}" } } , "_source" : [ "{key1}" , "{key2}" ] }
排序
加入 sort 参数
1
2
3
4
5
6
7
8
9
10
11
12
13
14
15
GET /{ index} /_search { "query" : { "match" : { "{key}" : "{value}" } } , "sort" : [ { "{key}" : { "order" : "desc/asc" } } ] }
分页
加入 from 和 size 参数,from为从哪条数据开始,size为每页返回多少条数据
1
2
3
4
5
6
7
8
9
10
GET /{ index} /_search { "query" : { "match" : { "{key}" : "{value}" } } , "from" : 0 , "size" : 1 }
多条件匹配查询
使用must,表示每个条件都要符合 (and)
使用should,表示满足其中一个就行 (or)
使用must_not,表示查询不满足下列条件的文档
每个match对应一个条件
1
2
3
4
5
6
7
8
9
10
11
12
13
14
15
16
17
18
19
GET /banana/_search { "query" : { "bool" : { "must/should/must_not" : [ { "match" : { "name" : "BA_NANA" } } , { "match" : { "age" : "18" } } ] } } }
过滤查询
在 bool 下使用 filter 即可
gte大于等于 gt大于 lte小于等于 lt小于
1
2
3
4
5
6
7
8
9
10
11
12
13
14
15
16
17
18
19
20
21
22
23
GET /banana/_search { "query" : { "bool" : { "must" : [ { "match" : { "name" : "如云" } } ] , "filter" : [ { "range" : { "age" : { "gte" : 10 , "lte" : 20 } } } ] } } }
匹配多个条件
使用空格隔开关键字即可,只要满足其中一个结果就可以被查出
1
2
3
4
5
6
7
8
GET /banana/_search { "query" : { "match" : { "name" : "名字1 名字2" } } }
精确查询
term 通过倒排索引进行精确查找,而match使用分词器解析
多个值精确搜索
参考 多条件匹配查询 ,将 match 替换成 term 即可
搜索高亮
使用 highlight 即可,会返回高亮部分的HTML标签
pre_tags 为自定义前缀标签,post_tags 为自定义后缀标签
1
2
3
4
5
6
7
8
9
10
11
12
13
14
15
GET /banana/_search { "query" : { "match" : { "name" : "banana" } } , "highlight" : { "pre_tags" : "<p class='key' style='color:red'>" , "post_tags" : "</p>" , "fields" : { "name" : { } } } }
七. SpringBoot中使用
参考官方文档:https://www.elastic.co/guide/en/elasticsearch/client/index.html
1.Maven依赖
1 2 3 4 5 <dependency > <groupId > org.elasticsearch.client</groupId > <artifactId > elasticsearch-rest-high-level-client</artifactId > <version > 7.8.1</version > </dependency >
2.初始化说明
A RestHighLevelClient instance needs a REST low-level client builder to be built as follows:
1
2
3
4
RestHighLevelClient client = new RestHighLevelClient ( RestClient.builder( new HttpHost ("localhost" , 9200 , "http" ), new HttpHost ("localhost" , 9201 , "http" )));
The high-level client will internally create the low-level client used to perform requests based on the provided builder. That low-level client maintains a pool of connections and starts some threads so you should close the high-level client when you are well and truly done with it and it will in turn close the internal low-level client to free those resources. This can be done through the close:
In the rest of this documentation about the Java High Level Client, the RestHighLevelClient instance will be referenced as client.
注意使用IDEA生成项目时要勾选Spring Data中ES的组件(在Nosql中)
若SpringBoot版本搭配的ES版本过低,可在pom.xml中手动调至需要的版本,例如:
1 2 3 4 <properties > <java.version > 11</java.version > <elasticsearch.version > 7.6.1</elasticsearch.version > </properties >
3.编写Config配置
1
2
3
4
5
6
7
8
9
10
11
@Configuration public class ElasticSearchClientConfig { @Bean public RestHighLevelClient restHighLevelClient () { RestHighLevelClient client = new RestHighLevelClient ( RestClient.builder( new HttpHost ("localhost" , 9200 , "http" ))); return client; } }
4.索引相关操作
创建索引
1
2
3
4
5
6
7
8
void testCreateIndex () throws IOException { CreateIndexRequest request = new CreateIndexRequest ("ming_index" ); CreateIndexResponse createIndexResponse = client.indices().create(request, RequestOptions.DEFAULT); System.out.println(createIndexResponse); }
获取索引
1 2 3 4 5 6 7 void testSearchIndex () throws IOException { GetIndexRequest request = new GetIndexRequest ("ming_index" ); boolean exists = client.indices().exists(request, RequestOptions.DEFAULT); System.out.println(exists); }
删除索引
1
2
3
4
5
6
void testDeleteIndex () throws IOException { DeleteIndexRequest request = new DeleteIndexRequest ("ming_index" ); AcknowledgedResponse delete = client.indices().delete(request, RequestOptions.DEFAULT); System.out.println(delete.isAcknowledged()); }
5.文档相关操作
创建文档
1
2
3
4
5
6
7
8
9
10
11
12
13
14
15
16
17
18
19
void testAddDocument () throws IOException { User user = new User ("banana" ,3 ); IndexRequest request = new IndexRequest ("ming_index" ); request.id("1" ); request.timeout(TimeValue.timeValueSeconds(1 )); request.timeout("1s" ); request.source(JSON.toJSONString(user), XContentType.JSON); IndexResponse indexResponse = client.index(request, RequestOptions.DEFAULT); System.out.println(indexResponse.toString()); System.out.println(indexResponse.status()); }
判断文档是否存在
1 2 3 4 5 6 7 8 9 10 void testIsExists () throws IOException { GetRequest request = new GetRequest ("ming_index" ,"1" ); request.fetchSourceContext(new FetchSourceContext (false )); request.storedFields("_none_" ); boolean exists = client.exists(request,RequestOptions.DEFAULT); System.out.println(exists); }
获取文档信息
1
2
3
4
5
6
7
void testGetDocument () throws IOException { GetRequest request = new GetRequest ("ming_index" ,"1" ); GetResponse response = client.get(request,RequestOptions.DEFAULT); System.out.println(response.getSourceAsString()); }
更新文档
1
2
3
4
5
6
7
8
9
10
void testUpdateDocument () throws IOException { UpdateRequest request = new UpdateRequest ("ming_index" ,"1" ); request.timeout("1s" ); User user = new User ("天津理工大学" , 19 ); request.doc(JSON.toJSONString(user), XContentType.JSON); UpdateResponse response = client.update(request, RequestOptions.DEFAULT); System.out.println(response.status()); }
删除文档
1
2
3
4
5
6
7
void testDeleteRequest () throws IOException { DeleteRequest request = new DeleteRequest ("ming_index" ,"1" ); request.timeout("1s" ); DeleteResponse response = client.delete(request, RequestOptions.DEFAULT); System.out.println(response.status()); }
批量操作文档
1
2
3
4
5
6
7
8
9
10
11
12
13
14
15
16
17
18
19
20
21
22
void testBulkRequest () throws IOException { BulkRequest request = new BulkRequest (); request.timeout("10s" ); ArrayList<User> userList = new ArrayList <>(); userList.add(new User ("小明" ,10 )); userList.add(new User ("小红" ,16 )); userList.add(new User ("小张" ,13 )); userList.add(new User ("小赵" ,8 )); for (int i=0 ;i<userList.size();i++){ request.add(new IndexRequest ("ming_index" ) .id("" +(i+1 )) .source(JSON.toJSONString(userList.get(i)),XContentType.JSON) ); } BulkResponse response = client.bulk(request, RequestOptions.DEFAULT); System.out.println(response.hasFailures()); }
查询文档
1 2 3 4 5 6 7 8 9 10 11 12 13 14 15 16 17 18 19 20 21 22 23 24 25 26 27 28 void testSearch () throws IOException { SearchRequest request = new SearchRequest ("ming_index" ); SearchSourceBuilder sourceBuilder = new SearchSourceBuilder (); TermQueryBuilder termQueryBuilder = QueryBuilders.termQuery("name.keyword" ,"小明" ); sourceBuilder.query(termQueryBuilder); sourceBuilder.timeout(new TimeValue (60 , TimeUnit.SECONDS)); request.source(sourceBuilder); SearchResponse response = client.search(request, RequestOptions.DEFAULT); System.out.println(JSON.toJSONString(response.getHits())); System.out.println("======================" ); for (SearchHit fields : response.getHits().getHits()) { System.out.println(fields.getSourceAsMap()); } }
八. 项目实战
创建索引
在Kibana中创建,注意要指定分词器,否则默认standard
分词器被使用的情况:
第一种是插入文档时,将text类型的字段做分词然后插入倒排索引(analyzer),
第二种就是在查询时,先对要查询的text类型的输入做分词,再去倒排索引搜索(search_analyzer)
1
2
3
4
5
6
7
8
9
10
11
12
13
14
15
16
17
18
19
20
21
22
PUT /jd_goods { "settings" : { "number_of_shards" : "5" , "number_of_replicas" : "1" } , "mappings" : { "properties" : { "title" : { "type" : "text" , "analyzer" : "ik_max_word" , "search_analyzer" : "ik_max_word" } , "img" : { "type" : "text" } , "price" : { "type" : "text" } } } }
爬虫(作为数据源)
1.Maven依赖导入jsoup
1 2 3 4 5 6 <dependency > <groupId > org.jsoup</groupId > <artifactId > jsoup</artifactId > <version > 1.10.2</version > </dependency >
2.爬取网页信息(并封装实体类)
1
2
3
4
5
6
7
8
9
10
11
12
13
14
15
16
17
18
19
20
21
22
23
24
25
26
27
28
29
30
@Component public class HtmlParseUtil { public static void main (String[] args) throws IOException { new HtmlParseUtil ().parseJD("乔布斯" ).forEach(System.out::println); } public List<Content> parseJD (String keywords) throws IOException { String url = "https://search.jd.com/Search?keyword=" +keywords; Document document = Jsoup.parse(new URL (url), 30000 ); Element element = document.getElementById("J_goodsList" ); Elements elements = element.getElementsByTag("li" ); ArrayList<Content> goodsList = new ArrayList <>(); for (Element el : elements) { String img = el.getElementsByTag("img" ).eq(0 ).attr("src" ); String price = el.getElementsByClass("p-price" ).eq(0 ).text(); String title = el.getElementsByClass("p-name" ).eq(0 ).text(); Content content = new Content (title,img,price); goodsList.add(content); } return goodsList; } }
Service层
实现数据放入ES索引、搜索功能
1
2
3
4
5
6
7
8
9
10
11
12
13
14
15
16
17
18
19
20
21
22
23
24
25
26
27
28
29
30
31
32
33
34
35
36
37
38
39
40
41
42
43
44
45
46
47
48
49
50
51
52
53
54
@Service public class ContentService { @Autowired private RestHighLevelClient restHighLevelClient; public Boolean parseContent (String keywords) throws IOException { List<Content> contentList = new HtmlParseUtil ().parseJD(keywords); BulkRequest bulkRequest = new BulkRequest (); bulkRequest.timeout("2m" ); for (int i=0 ;i<contentList.size();i++){ bulkRequest.add( new IndexRequest ("jd_goods" ) .source(JSON.toJSONString(contentList.get(i)), XContentType.JSON)); } BulkResponse bulk = restHighLevelClient.bulk(bulkRequest, RequestOptions.DEFAULT); return !bulk.hasFailures(); } public List<Map<String,Object>> searchPage (String keywords, int pageNum, int pageSize) throws IOException { if (pageNum<=0 ){ pageNum=0 ; } SearchRequest searchRequest = new SearchRequest ("jd_goods" ); SearchSourceBuilder sourceBuilder = new SearchSourceBuilder (); sourceBuilder.from(pageNum); sourceBuilder.size(pageSize); MatchQueryBuilder matchQueryBuilder = QueryBuilders.matchQuery("title" ,keywords); matchQueryBuilder.analyzer("ik_max_word" ); sourceBuilder.query(matchQueryBuilder); sourceBuilder.timeout(new TimeValue (60 , TimeUnit.SECONDS)); searchRequest.source(sourceBuilder); SearchResponse searchResponse = restHighLevelClient.search(searchRequest, RequestOptions.DEFAULT); ArrayList<Map<String,Object>> list = new ArrayList <>(); for (SearchHit fields : searchResponse.getHits().getHits()) { list.add(fields.getSourceAsMap()); } return list; } }
Controller层
1
2
3
4
5
6
7
8
9
10
11
12
13
14
15
16
17
18
@RestController public class ContentController { @Autowired private ContentService contentService; @GetMapping("/parse/{keywords}") public Boolean parse (@PathVariable("keywords") String keywords) throws IOException { return contentService.parseContent(keywords); } @GetMapping("/search/{keywords}/{pageNum}/{pageSize}") public List<Map<String,Object>> search (@PathVariable("keywords") String keywords, @PathVariable("pageNum") int pageNum,@PathVariable("pageSize") int pageSize) throws IOException { return contentService.searchPage(keywords,pageNum,pageSize); } }
九. ES与MySQL/MongoDB数据同步
安装logstash
注意版本号和 ES 一致即可(例如我用的是7.8.1版本,实测树莓派Arm64需要安装7.9.0+版本)
链接:https://artifacts.elastic.co/downloads/logstash/logstash-7.8.1.zip
解压后开箱即用,在 bin 文件夹执行以下命令测试
1 ./logstash -e 'input { stdin { } } output { stdout {} }'
安装 logstash-input-jdbc 插件
1 2 3 4 5 6 yum install gem gem sources --add https://gems.ruby-china.com/ --remove https://rubygems.org/ gem sources -l
注意:logstash 目录下的 Gemfile 中 source 的值也要切换为对应的源
进入 logstash 的 bin 目录下,执行下列命令
1 ./logstash-plugin install logstash-input-jdbc
发现logstash本身已经支持这个插件了,于是它终止了安装(不用理会)。
配置
首先要下载对应的 mysql-connector-java 包,具体可以百度
在 bin 下新建目录 config-mysql 并创建 mysql.conf 文件
1
2
3
mkdir config-mysql cd config-mysql vim mysql.conf
mysql.conf文件参考,注意自行调整参数
1
2
3
4
5
6
7
8
9
10
11
12
13
14
15
16
17
18
19
20
21
22
23
24
25
26
27
28
29
30
31
32
33
34
35
36
37
38
39
40
41
42
43
44
45
46
47
48
input { stdin { } jdbc { # 数据库 jdbc_connection_string => "jdbc:mysql://localhost:3306/minishop" # 用户名密码 jdbc_user => "root" jdbc_password => "test123456" # jar包的位置 jdbc_driver_library => "/home/logstash-7.8.1/mysql-connector-java-6.0.6.jar" # mysql的Driver jdbc_driver_class => "com.mysql.jdbc.Driver" jdbc_paging_enabled => "true" jdbc_page_size => "50000" #statement_filepath => "config-mysql/product.sql" statement => "select * from product" schedule => "* * * * *" #索引的类型 type => "product" } } filter { json { source => "message" remove_field => ["message"] } } output { elasticsearch { hosts => "127.0.0.1:9200" # index名 index => "product" # 需要关联的数据库中有一个id字段,对应索引的id号 document_id => "%{prod_id}" # 模板,注意文件位置 template_name => "logstash" template => "/home/logstash-7.8.1/bin/config-mysql/logstash.json" template_overwrite => true manage_template => true } stdout { codec => json_lines } }
模板文件 logstash.json如下(为了将默认分词器设置为ik)
1
2
3
4
5
6
7
8
9
10
11
12
13
14
15
16
17
18
19
20
21
22
23
24
25
26
27
28
29
30
31
{ "index_patterns" : [ "*" ] , "order" : 0 , "version" : 1 , "settings" : { "number_of_shards" : 1 , "number_of_replicas" : 0 } , "mappings" : { "date_detection" : true , "numeric_detection" : true , "dynamic_templates" : [ { "string_fields" : { "match" : "*" , "match_mapping_type" : "string" , "mapping" : { "type" : "text" , "norms" : false , "analyzer" : "ik_max_word" , "fields" : { "keyword" : { "type" : "keyword" } } } } } ] } }
最后进入bin目录下执行
1 ./logstash -f config-mysql/mysql.conf
大功告成!过一段时间去 ES-head 中查看下索引状态,会发现数据库中的表被同步过去了。
如果想一直运行,得以后台运行方式执行命令,具体方式请在本网站搜索:linux学习之旅4。
注意:如果通过 Kibana GET 索引名 发现分词器没有设置成功,可以发送以下请求
1
2
3
4
5
6
7
8
9
10
11
12
13
14
15
16
17
18
19
20
21
22
23
24
25
26
27
28
29
30
31
32
Post _template/template_default { "index_patterns" : [ "*" ] , "order" : 0 , "version" : 1 , "settings" : { "number_of_shards" : 1 , "number_of_replicas" : 0 } , "mappings" : { "date_detection" : true , "numeric_detection" : true , "dynamic_templates" : [ { "string_fields" : { "match" : "*" , "match_mapping_type" : "string" , "mapping" : { "type" : "text" , "norms" : false , "analyzer" : "ik_max_word" , "fields" : { "keyword" : { "type" : "keyword" } } } } } ] } }
MongoDB同步至ES
方法一:使用 logstash+MongoJdbcDriver,成功同步
1)下载MongoJdbcDriver
https://dbschema.com/jdbc-drivers/MongoDbJdbcDriver.zip
2)解压文件,将所有jar包放入logstash目录下的 logstash-core/lib/jars/文件夹
3)编写conf文件
1
2
3
4
5
6
7
8
9
10
11
12
13
14
15
16
17
18
19
20
21
22
23
24
25
26
27
28
29
30
31
32
33
34
35
36
input { jdbc{ jdbc_driver_class => "com.dbschema.MongoJdbcDriver" jdbc_driver_library => "/home/banana/project/logstash-7.9.0/logstash-core/lib/jars/mongojdbc3.1.jar" jdbc_user => "" jdbc_password => "" jdbc_connection_string => "jdbc:mongodb://user:password@localhost:27017/db1?authSource=admin" schedule => "*/30 * * * * *" statement => "db.CET4_2.find({}, {_id: 0})" } } filter { } output { elasticsearch { hosts => "localhost:9200" user => "root" password => "test123456" # index名 index => "testdata" # 需要关联的数据库中有一个id字段,对应索引的id号,多级字段写法如下 document_id => "%{[document][content][word][wordId]}" # 模板 template_name => "logstash" template => "/home/banana/project/logstash-7.9.0/bin/config-mysql/logstash.json" template_overwrite => true manage_template => true } stdout { codec => json_lines } }
到此,运行logstash即可(遇到jar包报文件目录不存在的错误,按照路径创建即可解决)。
方法二:mongo-connector(个人尝试未成功,仅供参考)
官方文档:https://github.com/yougov/mongo-connector
1)安装
1
2
pip install mongo-connector pip install 'mongo-connector[elastic5]'
2)MongoDB开启副本
1
2
3
4
5
6
mongo rs.initiate() cfg = rs.conf() cfg.members[0].host = "localhost:27017" rs.reconfig(cfg)
3)编写配置文件 config.json
1
2
3
4
5
6
7
8
9
10
11
12
13
14
15
16
17
18
19
20
21
22
23
24
25
26
27
28
29
{ "mainAddress" : "localhost:27017" , "authentication" : { "adminUsername" : "root" , "password" : "test123456" } , "oplogFile" : "/home/banana/oplog.timestamp" , "logging" : { "type" : "file" , "filename" : "/home/banana/mongo-connector.log" , "format" : "%(asctime)s [%(levelname)s] %(name)s:%(lineno)d - %(message)s" , "rotationWhen" : "midnight" , "rotationInterval" : 1 , "rotationBackups" : 10 } , "namespaces" : { "include" : [ "数据库名.表名" ] } , "docManagers" : [ { "docManager" : "elastic2_doc_manager" , "targetURL" : "username:password@localhost:9200" , "bulkSize" : 1000 , "autoCommitInterval" : 5 } ] }
4)启动
1 mongo-connector -c config.json
关于错误:
同步时遇到一个Failed during dump collection cannot recover!的错误,暂未解决。
十. ES-head数据游览不显示问题
错误现象:
解决方法cd _site/contentType: "application/x-www-form-urlencoded" 修改为 contentType: "application/json;charset=UTF-8"var inspectData = s.contentType === "application/x-www-form-urlencoded" 修改为 var inspectData = s.contentType === "application/json;charset=UTF-8"
十一. ES和相关组件配置密码访问
通过前面的安装会发现,ES、es-head和kibana服务都是暴露出来,没有加密验证的。如果这些服务运行在公网ip端口上,会十分的不安全。
ElasticSearch配置
首先进入到ElasticSearch的安装文件夹,进入 config 目录,配置 elasticsearch.yml 文件如下所示(主要添加X-Pack):
1
2
3
4
5
6
7
cluster.name: "docker-cluster" network.host: 0.0 .0 .0 http.cors.enabled: true http.cors.allow-origin: "*" xpack.security.enabled: true xpack.security.transport.ssl.enabled: true http.cors.allow-headers: "*"
然后返回上一级,进入 bin 目录,执行命令:./elasticsearch-setup-passwords interactive ,根据提示设置密码即可。
最后,重启 ElasticSearch 服务,访问9200端口,提示输入用户名和密码即成功。(用户名默认是elastic)
es-head组件配置
在上面配置完ES的用户名和密码后,如果想通过es-head去访问数据,那么只需要加鉴权信息即可。
首先,要确保你的 elasticSearch.yml 文件里,允许跨域请求头。
1 http.cors.allow-headers: "*"
然后,通过以下连接访问es-head即可:
1 http://127.0.0.1:9100/?auth_user=elastic&auth_password=password
注意替换成自己的ip地址和端口,并替换用户名和密码。
Kibana配置
进入到Kibana目录,进入 config 文件夹,编辑 kibana.yml 文件:
1 2 3 4 5 6 7 8 9 10 11 server.name: kibana server.host: "0" elasticsearch.hosts: [ "http://127.0.0.1:9200" ]monitoring.ui.container.elasticsearch.enabled: true elasticsearch.username: "elastic" elasticsearch.password: "password"
配置上述文件中ES的用户名和密码参数即可。
logstash配置
① 进入config目录,修改logstash.yml文件,修改下列参数:
1
2
3
4
xpack.monitoring.enabled: true xpack.monitoring.elasticsearch.username: elastic xpack.monitoring.elasticsearch.password: 123456 xpack.monitoring.elasticsearch.hosts: ["http://ip:9200" ]
② 修改运行的conf文件output部分:
1
2
3
4
5
6
7
output { elasticsearch { # 补充下面两个参数 user => elastic password => 123456 } }
 wechat
 alipay